SAP Transport System; Step-by-step guide from concept to practical
•
123 gefällt mir•71,405 views

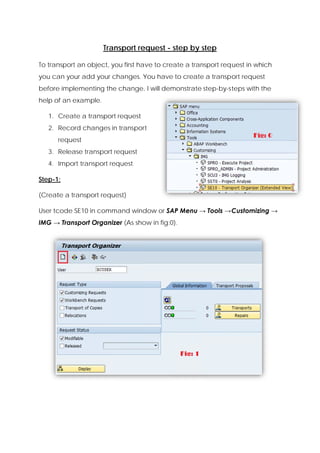
To transport an object, you must first create a transport request, record changes in the request, release the request, and then import the request on the target system. This involves the following steps: 1. Create a transport request by selecting "Workbench Request" or "Customizing Request" in the transport organizer. 2. Record changes by adding objects like tables or programs to the request. 3. Release the request after changes have been added. 4. Import the released request on the target system using the transport management system.

Empfohlen
Weitere ähnliche Inhalte
Was ist angesagt?
Was ist angesagt? (20)
Andere mochten auch
Ähnlich wie SAP Transport System; Step-by-step guide from concept to practical
Ähnlich wie SAP Transport System; Step-by-step guide from concept to practical (20)
Kürzlich hochgeladen
Kürzlich hochgeladen (20)
SAP Transport System; Step-by-step guide from concept to practical
- 1. Tran nsport re equest - step by step s s To tran nsport an object, yo first ha ve to crea a tran ou ate nsport req uest in wh hich you ca your ad your changes. Y an dd c You have to create a transp e port request before impleme e enting the change. I will dem e . monstrate step-by-s teps with the help o an exam of mple. 1. Create a transport request t 2. Record changes in transpor n rt request 3. Release transport request r 4. Import tra ansport request Step-1; (Creat a transport reque te est) User tc code SE10 in comm 0 mand wind dow or SA Menu → Tools → Customizi AP ing → IMG → Transpor Organiz (As sho in fig:0). rt zer ow
- 2. In “transport org ganization n” window, select create (a as highlig ghted in fig and a g:1) new sc creen will appear like Fig:2. Y You have to choose “Workbench Re equest” an nd click O Ok. quest type depend on the object tha is supported to b transpo The req ds at be orted. Custom mizing req quests are used for customizing chang e ges, such a the as mainte enance o table. of Workb bench req quests are used for r repository changes (program for exa y s ms, ample) Note t that changes to the customiz e zing can’t be transported wiith a workbench request and vice versa a. The ne screen is fig:3, You need t enter so ext n to ome mea aningful sh hort description here. If necessa assign PROJECT (it depen on the configura ary nds e ation of transp port system m). In the TARGET field, put th name he of targ system In TASK field, get m. enter t the user id of all em d mployees that are suppos sed to ent ter chang ges. When done pre SAVE n ess button from bot n ttom of sc creen as shown in fig:3. n
- 3. On the compila e ation of sa ave fig:4 w appear This is a will r. summa of cha ary ange reques System will st. m autom matically g generate a numbe for this change er reques The composition of st. n numbe is <Syste er em-id>K9 9<number r> Now y you have s successfully create ed transp port request. Step-2 (Record changes in transp 2: d s port reque est) In this s step you w add changed o will c objects (w which you want to t transport) into “chan est”. I my case I will use SM30 to bring “Maintain Table vie nge reque c “ n ew” as shown in fig:5 n Put table na t ame PRGN N_CUST and press MA d AINTAIN button b from the bot m ttom of sc creen as shown in f s fig:5 A caution will appear, sim mply ackno owledge a and proce eed to nex xt screen (Fig:6) n
- 4. Press N NEW ENTRIES button it will en n, nable the typing on same scr n reen (as shown in fig:7 Type fie name CUA_PAR 7). eld RAMETER_ _CHECK and put va “I” as shown ale s in fig:7 7 When you done press SA butto n from top menu. This will tak you to next e, AVE p T ke dialog as shown in fig:8, put g n p your re equest number NSPK900002 or b browse by y pressin given b ng button. In my c case I am browsing and it m g will tak you to next scree (fig:9) ke en Move your curso to desir or re chang request number (as show ge in fig:9 and pre green tick. You 9) ess t will ba again to fig:8 as show in ack s fig:8A. Press gre . een tick to o complete the SA AVE process. On successful save message will e appea as show below. ar wn
- 5. This is e end of ste ep-2; this means that you have s u added change into d es port request. transp Step-3 (Release transpor request) 3: e rt ) This is t nsport req uest beca time to release tran ause you have add ded/recor rded our ch hanges in “change request”. Type SE10 in comm . mand win ndow and same screen like fig:1 will appe but he I am gi n ear ere iving sequ uence # 1 0 so it’s fig g:10. Type u username, tick reques status M st MODIFIABL LE and press DISPLAY button n as illustrated in f fig:10. The ne screen is ext n fig:11. Move your course on chan er nge object and pres t ss RELEAS SE button from the too bar as s ol shown in fig:11 . Status bar will sh how relea ase messa age
- 6. Refresh the scre een and move you cursor to change request nu m r umber NSPK900002, ag gain press RELEASE b button as shown in fig:12. On the successf release you will r e ful e receive re elease sum mmary as show in fi ig:13. This is e end of change req quest relea proce (Note: fig: 13 an onward pics ase ess. nd d are no from my system so that’s w there will be dif ot y why fferent pa arameter)
- 7. Possible return c code: 0 : Suc ccessfully c complete ed 4 : End ded with w warning 8 : End ded with e errors 12 or h higher: Tra ansport ha not bee execut as en ted Import tant: Transp port reque consist of two file 1) control file an 2) data file est es, nd a The loccation of control file is <path h>usrsap ptrans cofiles an remem nd mber this sta with K arts The loc cation of data file <path>u < usrsaptransdata a REMEM MBER: You can also use SE01 for exten u o nded view of Transp w port Organizer Step-4 (Import transport request) 4: After the release the targ system IMPOR QUEUE will be au e, get m’s RT utomatica ally updat ted. You h have to logon to ta rget syste and type STMS in comma em n and window. Transport Management S System’s (T TMS) main screen w appea as n will ar shown in fig:14. n Press the IMPOR VERVIEW RT W ton as hig butt ghlighted in i fig:14. This will ta you to ake o the ne screen fig:15 ext
- 8. Move your curso to target system and pres DISPLAY IMPORT Q or ss Y QUEUE bu utton as high hlighted in fig:15. (M system don’t ha any im n My m ave mport requ uest that’s way “Requ uest” colum is emp mn pty) By pre essing DISP PLAY IMPO QUEUE system will display a list of “import ORT E, reques as show in Fig:16 st” wn Move your curso to the or desired request number and d a MPORT RE press IM EQUEST button as shown in fig:16. n n This will take you to the next u screen (fig:17); on this n screen you can schedule n n e the import request run tim me and ca chang target an ge client number. A After mak king desired change press gr d es reen tick.
- 9. May b system ask you to put user be o rname an passwo again. Your nex nd ord . xt screen (fig:18) w show that transp n will port imports is starte (Status column is ed. s showin truck). ng The be elow given is last ste in impo of tran n ep ort nsport requ uest. Look into scre k een (fig:19), status is ticked as green of some import and yellow dia s f amond fo or some r requests.
- 10. The return codes are Green tick or green block – this means all good; Yellow diamond means – warnings and Red dot means – error Note Few screen are collected from internet, just to demonstrate the process. REFERENCES: http://help.sap.com/saphelp_sm40/helpdata/en/b5/90cd3a21873650e10000 000a11402f/content.htm http://basissap.blogspot.com/2008/05/how-many-types-of-transport- requests.html http://help.sap.com/saphelp_nw70/helpdata/en/46/01f7f945e27042e100000 00a155369/frameset.htm