SlideShare ist ein Scribd-Unternehmen logo
1 von 15
Downloaden Sie, um offline zu lesen
Wire Jewelry–Making Basics
 5 Wire Jewelry Projects Using 4 Easy Techniques


                                           Make wire-wrapped loops


                                           Make wire coils


                                           Make wire spirals


        click
        here

                                           Texture wire

     From the designers featured on Beads, Baubles, and Jewels
THE #1 PUBLIC TELEVISION BEADING AND JEWELRY-MAKING SHOW
Wire Jewelry—Making Basics
5 Wire Jewelry Projects Using 4 Easy Techniques


    1 TECHNIQUE: wrapped loops
    3 LUCITE BLUES NECKLACE
      MELINDA BARTA

    5 TECHNIQUE: coils
    6 FLOWER BOUQUET NECKLACE
      DERYA AKSOY

    7 TECHNIQUE: spirals
    8 ROSE GLOW NECKLACE
      JAMIE HOGSETT

    9 TECHNIQUE: texture
   10 FILIGREE LINK BRACELET
      JANICE BERKEBILE

      MIXED TECHNIQUES:
   11 RINGS OF SATURN
      MARLENE BLESSING


   12 TECHNIQUES


           © 2010 Interweave. Not to be reprinted. All rights reserved.
                                       page ii
TECHNIQUE:

wrapped loops

        1
                                             2                                       3


   Wrapped Loops
   1.       To form a wrapped loop, make a 90° bend
                                                                                4
            at least 2" from the end of the wire.
   2, 3. Holding the wire so that the bent piece is
         pointing toward you, grasp the wire after the
         bend with round-nose pliers and form a
         simple loop with a tail that overlaps the bend.
   4.       Hold the loop with flat- or chain-nose pliers
            and use another pair of pliers or your fingers
            to wrap the tail tightly down the neck of the               5
            wire to create a couple of coils.
   5.       Trim the wire as closely to the neck
            of the wire as possible.
   6.       Use flat- or chain-nose pliers or the front
            notch of crimping pliers to softly press the
            remaining wire tail against the neck of
            the wire.                                                       6


                             © 2010 Interweave. Not to be reprinted. All rights reserved.
                                                         page 1
How to:
doubLe Wrapped Loops
                                                                                  7
To make a double wrapped loop, simply create a
wrapped loop as usual, then use the tail wire to
coil back up over the first coils, toward the loop; trim.

Wrapped-Loop Links
7.          To make a wrapped-loop link, form a
            wrapped loop on each end of a bead. Repeat
            with another bead, attaching one of the loops
            to a loop of the first link before coiling the
            tail down the neck of the wire.
                                                                            8

Wrapped-Loop baiLs
8.          Center the bead on a 3" or longer piece of
            wire. Bend both ends of the wire up the sides
            of the bead.
9, 10. Bend one end straight up at the center of
       the bead and the other horizontally, so that
       it is perpendicular to the first wire. Wrap the                                9
       horizontal wire around the straight-up wire
       to form a couple of coils.
11, 12. Form a wrapped loop with the straight-up wire,
        wrapping it back down over the already
        formed coils.

                                10


                                                                             11


     [ tips ]                                                                             12


     • Use round- or flat-nose pliers to squeeze together
       the coils if you made them too far apart.


                                 © 2010 Interweave. Not to be reprinted. All rights reserved.
                                                             page 2
LUCITE BLUES NECKLACE
MELINDA BARTA


                          Flirty vintage Lucite
                          flowers, classy glass
                         and stone beads, and
                         patinated chain evoke
                            the sentiments of
                              bygone times.


                © 2010 Interweave. Not to be reprinted. All rights reserved.
                                            page 3
MateriaLs
   4 clear/white 3mm fire-polished rounds
   24 aqua 3mm fire-polished rounds
   7 aquamarine 5×3mm faceted rondelles
   3 amazonite 9mm faceted rounds
   6 marbled gray 12mm vintage Lucite rounds
   14 white matte 15×5mm vintage Lucite flowers
   9 white matte 13×7mm vintage Lucite flowers
   1 sterling silver 15×25mm 2-strand box clasp with aqua
      flower inlay
   10 gunmetal 2" head pins
   4 gunmetal 5mm jump rings
   18" of sterling silver 24-gauge half-hard wire
   71⁄2" of silver 6×11mm textured oval chain
   8" of silver 4–5×4–6mm textured long-
      and-short chain


   tooLs
   Wire cutters
   Chain-nose pliers
   Round-nose pliers

   F i n i s h e d s i z e : 1 8 1⁄ 2"


   Strand                                         Dangles                                       round, 1 aqua round, 1 aquamarine
   1: Cut the oval chain into six 1" pieces       8: Use a head pin to string the follow-       rondelle, 1 aqua round, and 1 clear/
      and one 11⁄2" piece. Cut the long-             ing bead sequences, then form a            white round.
      and-short chain into six 1" pieces             simple loop:
      and one 2" piece.                                                                       9: Attach dangles to the 2" piece of
   2: Use 1 jump ring to attach 1 piece of        Dangle A: one 13x7mm flower.                   long-and-short chain in the center of
      1" oval chain to one loop of one half         Repeat.                                      the necklace by opening and closing
      of the clasp. Repeat using 1 piece          Dangle B: one 13x7mm flower and                the simple loops as you would
      of 1" long-and-short chain and the            1 aqua round. Repeat.                        jump rings and placing the longest
      other loop of the same half of the          Dangle C: one 13x7mm flower,                   dangles at the center and the short-
      clasp.                                        1 aquamarine rondelle, and 1 aqua            est at the ends of the chain.
   3: Use 3" of wire to form a wrapped              round.
      loop that attaches to the free ends         Dangle D: 1 amazonite round, one
      of both chains from the previous              13x7mm flower, and 1 aqua round.
      step; string 1 aqua round, one              Dangle E: one 13×7mm flower, 1 aqua-
      15×5mm flower, 1 gray round, one              marine rondelle, 1 clear/white round,
      15×5mm flower, and 1 aqua round.              and 1 aqua round.
      Form a wrapped loop that attaches           Dangle F: 1 amazonite round, one
      to the end of 1 piece of 1" oval              15×5mm flower, 1 aquamarine ron-
      chain and 1 piece of 1" long-and-             delle, and 1 aqua round.
      short chain.                                Dangle G: 1 amazonite round, one
   4: Repeat Step 3.                                15×5mm flower, one 13×7mm flower,
   5: Repeat Step 3 using the 1 1⁄2" piece          1 aquamarine rondelle, 1 clear/white
      of oval chain and the 2" piece of             round, and 1 aqua round.
      long-and-short chain.                       Dangle H: 1 aqua round, 1 aquama-
   6: Repeat Step 3 three times.                    rine rondelle, one 13×7mm flower,
   7: Repeat Step 2 to attach the free ends         1 aqua round, 1 aquamarine ron-
      of the last chains used to the clasp.         delle, 1 aqua round, 1 clear/white

ResouRces: Check your local bead shop or contact: Clasp: Jess Imports (wholesale only), (415) 626-1433, www.jessimports.com. Chain: AD
Adornments, kathyd33@yahoo.com, www.adadornments.com. Wire, head pins, and jump rings: Fusionbeads.com, (888) 781-3559. Lucite
rounds and flowers: Art & Soul Beads, (812) 285-0000, www.artandsoulbeads.com. Fire-polished and amazonite rounds: Let It Bead, (303)
788-1466. Aquamarine rondelles: Desert Gems, (303) 426-4411, www.desertgemsinc.com.


                                         © 2010 Interweave. Not to be reprinted. All rights reserved.
                                                                     page 4
TECHNIQUE:

coils
                                                                                            How to:
 1.   To make a coil, use one hand to hold                                 2.   To remove the coil, slide it off the
      the end of your wire against a mandrel                                    mandrel. Add a simple loop on
      (or whatever object you want to coil                                      either end to use the coil as is or
      around). With the other hand, wrap                                        cut the coil to make jump rings or
      the wire around the mandrel.                                              split rings.


                         1                                                                          2


      [ tips ]
      COILING GIzMO
      For fast, easy coils, use a Coiling Gizmo, a tool
      with which you make coils on a coiling rod by turning
      a hand crank. (If using this tool, see the manufacturer’s
      manual for detailed instructions.)


                                     © 2010 Interweave. Not to be reprinted. All rights reserved.
                                                                  page 5
FLOWER BOUQUET NECKLACE
DERYA AKSOY


             Derya turns
          beaded head pins
             into a cute
          bouquet pendant
            that’s easy to
            make and fun
              to wear.


MateriaLs                                       Flowers                                            to coil the other end of the eye pin
11 light Siam AB 4mm crystal bicones            1: Use a head pin to string 1 crystal. Use         around the head-pin coils. Gently
1 brass 5×7mm lobster clasp                        flat-nose pliers to fold the last 1⁄8" of       curve the flower ends of the head
13 brass 11⁄2" 22-gauge head pins                  the head pin onto itself. Repeat ten            pins with your fingers to open up
                                                   times for a total of 11 flowers.                the bouquet.
1 brass 11⁄2" 22-gauge eye pin
1 brass 5mm jump ring
                                                Bouquet                                         Necklace
1 brass 6mm jump ring                                                                           3: Attach the eye pin to the center link
                                                2: Hold the flowers together in a bunch,
161⁄2" of brass 2mm chain                          pushing the crystals to the head ends           of the chain as you would a jump
                                                   of the pins and staggering the “stems”          ring. Use the 5mm jump ring to
tooLs                                              to give the bouquet a more natural              attach the lobster clasp to one end
Round-nose pliers                                  look. Use flat-nose pliers to coil a head       of the chain. Attach the 6mm jump
Flat-nose pliers                                   pin around the middle of the bouquet;           ring to the other end of the chain.
                                                   repeat with another head pin. Hold
                                                   the eye pin behind the center coils of       ResouRces: Check your local bead shop
Finished size: 17"                                 the bouquet with the eye end about           or contact: Crystals and similar brass find-
                                                   1
                                                    ⁄4" above the coils; use flat-nose pliers   ings: Fusionbeads.com, (888) 781-3559.


                                  © 2010 Interweave. Not to be reprinted. All rights reserved.
                                                              page 6
TECHNIQUE:

spirals
 oXidizinG
                                                                                            How to:
 1.   To start a spiral (or scroll), make a small loop
      at the end of a wire with round-nose pliers.
 2.   Enlarge the piece by holding onto the spiral
      with chain-nose pliers and pushing the wire
      over the previous spiral with your fingers
      for as many revolutions as desired.
 3.   If desired, bend the tail wire 90° at the top                       1

      of the spiral. Use as a head pin or form a simple
       loop to attach to other items.


 s-shaped doubLe spiraLs
 4.   To create double spirals in the form of an S,
      scroll one to the center of the wire.
 5.   Repeat on the other end of the wire, spiraling
                                                                          2
      the wire in the opposite direction.


                 3


                                                                              5


                  4


                             © 2010 Interweave. Not to be reprinted. All rights reserved.
                                                         page 7
ROSE GLOW NECKLACE
JAMIE HOGSETT


                                                                                      Spiral drops dress up
                                                                                 foil-lined coins in this chunky
                                                                                    wrapped-loop necklace.

MateriaLs                                           1: Use 3" of silver wire to form a double-    6: Attach 8" of beading wire to one
1 g eggplant matte size 11° seed beads                 wrapped loop; string 1 purple round           of the wrapped loops formed in
5 purple 18mm faceted glass rounds                     and form a double-wrapped loop.               Step 5 using a crimp tube. String
4 purple foil-lined 28mm glass coins                2: Use 6" of silver wire to form a               61⁄2" of seed beads, 1 crimp tube,
                                                       wrapped loop that attaches to the             and the other wrapped loop formed
2 sterling silver 6×16mm cones
                                                       previous double-wrapped loop,                 in Step 5; pass back through the tube
1 sterling silver 12mm toggle clasp
                                                       leaving a 2" tail after wrapping; string      and crimp. Repeat entire step twice.
6 sterling silver 2mm crimp tubes
                                                       1 coin and form a wrapped loop,            7: Use one of the wrapped-loop wires to
24" of .019 beading wire                               leaving another 2" tail. Use the 2"           string the wide end of 1 cone and form
45" of silver 22-gauge wire                            tails to form spirals that rest on top        a double-wrapped loop that attaches
                                                       of each side of the coin.                     to the bar half of the clasp. Repeat,
tooLs                                               3: Use 3" of silver wire to form a double-       attaching the double-wrapped loop
Wire cutters                                           wrapped loop that attaches to the             to the first double-wrapped loop
                                                       previous wrapped loop; string 1               formed in Step 1.
Flat-nose pliers
                                                       purple round and form a double-
Round-nose pliers
                                                       wrapped loop.                              ResouRces: Check your local bead shop
Crimping pliers                                     4: Repeat Steps 2 and 3 three times,          or contact: Seed beads: Beyond Beadery,
                                                       attaching the last purple round to         (800) 840-5548, www.beyondbeadery
F i n i s h e d s i z e : 1 9 1⁄ 2"                    the ring half of the clasp before          .com. Coins and rounds: Jo-Ann Fabric
                                                       forming a double-wrapped loop.             and Craft Stores, (888) 739-4120, www
                                                    5: Use 3" of silver wire to form a            .joann.com. Cones and clasp: Bead Cache,
                                                       wrapped loop; repeat.                      (970) 224-4322, www.bead-cache.com.


                                      © 2010 Interweave. Not to be reprinted. All rights reserved.
                                                                  page 8
TECHNIQUE:

texture
                                                                                           How to:
    oXidizinG                                             When you are pleased with the color,
                                                          dip the metal into the cold water with
    To create the appearance of texture
                                                          baking soda to stop the reaction, then
    by patinating metal (usually fine or
                                                          rinse and dry. Brush, sand, or polish
    sterling silver) with liver of sulfur in
                                                          the surface for interesting results. If
    either liquid or chunk form, follow
                                                          you don’t like the patina, you can easily
    these instructions adapted from Kate
                                                          remove it by sanding or brushing it. If
    McKinnon’s “Hot Wire” article in
                                                          desired, seal your piece with any spray
    Beadwork magazine (June/July 2006).
                                                          fixative meant for metal; unsealed
    Clean your metal piece with soap and                  pieces will age, develop more patina, or
    warm water if it is dirty or oily.                    become shiny with wear.
    Find four glass, stainless steel, or
    ceramic bowls. Fill the first with enough             haMMerinG
    liver-of-sulfur solution to cover the piece
                                                          Pounding wire not only creates great
    of metal: Liver of sulfur in liquid form is
                                                          texture, but also strengthens metal.
    ready to use, but can be diluted; dissolve
                                                          To hammer, place your wire on a steel
    the chunk form in water following
                                                          bench block. Use the flat end of a
    the manufacturer’s instructions. Fill a
                                                          chasing hammer to flatten the wire, then
    second bowl with very hot water (which
                                                          use the ball end of the hammer to add
    speeds up the patination process) and
                                                          texture.
    a third with cold water (which slows
    down the process). Fill the fourth bowl
    with cold water mixed with about a
    tablespoon of baking soda (which acts
    as a neutralizing agent).
    Use stainless steel tweezers or plastic
    or wood tongs to dip the metal into the
    liver-of-sulfur solution. Rinse in the hot

                                                               [ tips ]
    or cold water. Continue to dip and rinse
    often to gradually build a patina.
    Lightly sand or brush the piece with a                     WORKING WITH LIVER OF SULFUR
    brass or wire brush, sandpaper, very fine
                                                               • Take the following precautions when using liver of
    steel wool, or other abrasive between
                                                                 sulfur: keep it away from acids, wear gloves to avoid
    dips to give more depth to the patina—a
                                                                 contact with the skin, and work in a well-ventilated
    textured surface picks up more patina
    than a smooth surface.                                       area since the fumes are toxic.

                                                               • Store both liquid and chunk forms of liver of sulfur
                                                                 in tightly sealed light- and air-proof containers.


                          © 2010 Interweave. Not to be reprinted. All rights reserved.
                                                      page 9
FILIGREE LINK BRACELET
JANICE BERKEBILE


       Hammer, spiral, and link—that's
         all it takes to make Janice's
        gorgeous spiral-link bracelet.


MateriaLs                                   Filigree links                                   Clasp
12 sterling silver 6mm jump rings           1: Cut five 5" pieces of copper wire, one 3"     5: Repeat Step 2 with the 3" copper wire. Use
2 sterling silver 8mm jump rings               piece of copper wire, and five 3" pieces         round-nose pliers to form a small spiral at
15" of sterling silver 22-gauge wire           of silver wire.                                  each end of the wire, rolling each spiral
28" of copper 16-gauge wire                 2: Use the flat end of the hammer to flatten        toward the center, but in opposite direc-
                                               1
                                                ⁄4" on both ends of each piece of copper        tions from each other. Grasp the wire with
                                               wire, creating a paddle on each end.             the widest (back) end of the long round-
tooLs                                       3: Use each piece of copper wire to make a          nose pliers about 1⁄4" from one spiral, with
Flush cutters                                  loosely wrapped S-shaped double-spiral           the spiral facing up. Press the wire around
Round-nose pliers                              link. Hammer the outside edges of each           the nose of the pliers to form a hook shape.
Chain-nose pliers                              link with the flat end of the hammer, then       Repeat in the opposite direction at the other
Long round-nose pliers                         with the ball end.                               end of the wire to form an S. Hammer the
Chasing hammer                                                                                  rounded ends of the clasp with the flat end
                                            Coiling                                             of the hammer, then with the ball end.
Bench block                                 4: Using 1 piece of silver wire and, leaving
Pounding pad                                   a 1⁄ 2" tail, form three coils around the     Bracelet assembly
                                               center of 1 link. If necessary, use chain-    6: Use two 6mm jump rings to attach one
F i n i s h e d s i z e : 7 1⁄ 4"              nose pliers to bunch the coils together           end of 1 link to one end of another link.
                                               tightly. Trim each end to 1⁄2" and use the        Repeat three times. Use two 6mm jump
                                               ends to form tight spirals that roll toward       rings to attach one of the end links to the
                                               the center of the link. Repeat entire step        clasp. Connect the two 8mm jump rings
                                               with the remaining links. Gently curve            and use two 6mm jump rings to attach
                                               each link with your fingers to wrap gently        one of them to the other end link.
                                               around the wrist.                             7: If desired, patinate the bracelet using liver
                                                                                                 of sulfur.
                                            ResouRces: Check your local bead shop or contact: Jump rings and wire: Quiltworks Northwest,
                                            (425) 453-6005, www.quiltworksnw.com.


                                       © 2010 Interweave. Not to be reprinted. All rights reserved.
                                                                   page 10
RINGS OF SATURN
MARLENE BLESSING


                        The planetary look of these
                            borosilicate rondelles,
                           coupled with the glass
                         pendant, make this a truly
                       galactic necklace. All it takes
                        is a little stringing, a couple
                          of jump rings, and some
                                 twists of wire!


                   © 2010 Interweave. Not to be reprinted. All rights reserved.
                                              page 11
MateriaLs
8 assorted 14×8mm borosilicate (boro) rondelles
1 purple 22mm lampworked glass disc
1 red-and-orange 38mm lampworked glass disc
12 Thai silver 9×6mm spacers
6 Thai silver 6×55mm hammered noodles
1 sterling silver 15mm toggle clasp
2 sterling silver 10mm jump rings
28" of dark red 2mm leather cord
12" of sterling silver 22-gauge half-hard wire
10" of sterling silver 20-gauge half-hard wire


tooLs
Round-nose pliers
Chain-nose pliers
Wire cutters

F i n i s h e d s i z e : 2 4 " p L u s 1 7⁄ 8" p e n d a n t


Pendant
1: Use 5" of 20-gauge wire to form a wrapped loop. Use the
   other end of the wire to string the 38mm and 22mm discs,
   then make a 90° bend 3⁄4" from the base of the wrapped
   loop. Use the end of the wire to form a spiral that rests on
   top of the 22mm disc.
2: Form a spiral on one end of 5" of 20-gauge wire, then string
   the two discs, front side first. Press the spiral flat on top of
   the 22mm disc. Use the other end of the wire at the back
   of the discs to wrap around the neck of the wrapped-loop
   wire, then bring the wire to the front of the discs, wrap it
   around one of the spirals formed previously, and form a
   small spiral at the end of the wire.

Necklace strand
3: Use the cord to string 1 boro, 1 spacer, 1 noodle, and 1 spacer
   three times. String 1 boro.
4: String the wrapped loop formed in Step 1.
5: Repeat Step 3, reversing the stringing sequence.
6: Center all the beads on the cord. Fold one of the cord ends
   in half, then use 6" of 22-gauge wire to make about 17 coils
   around the cord end to secure the cord loop; repeat with
   the other cord end.
7: Use 1 jump ring to attach one half of the clasp to one of
   the cord loops; repeat with the other half of the clasp and
   cord loop.

ResouRces: Contact your local bead shop or contact: Borosilicate
rondelles and glass discs: Bokamo Designs, (913) 648-4296, www
.bokamodesigns.com. Thai silver noodles and spacers: Somerset
Silver (wholesale only), (425) 641-3666, www.somerset-silver.com.
Jump rings: Via Murano, (877) 842-6872, www.viamurano.com.
Leather cord: Leather Cord USA, (877) 700-2673, www.leather
cordusa.com.


                                       © 2010 Interweave. Not to be reprinted. All rights reserved.
                                                                      page 12
Techniques                                                                                                                         flush/wire
To explore stringing further, consult Getting Started Stringing Beads and Stringing Style (both from Interweave).                    cutters


Crimping                            CriMp/Cord ends
                                                                        Wireworking
                                    consist of a loop
                                                                        MetaL Wire comes in many
                                    attached to a tube.
                                                                        finishes and gauges. The
                                    Dab the leather,
                                                                        lower the gauge number, the
                                    plastic, ribbon, or
          crimp tube                                                    thicker the wire. The hardness
                                    other cord with
                                                                        or softness of wire is called
               are seamless         jewelry glue, then
CriMp tubes                                                             “temper.” Most wire comes in
metal tubes used to secure          place it in the        crimp/cord   dead-soft, half-hard, and hard
the end of a beading wire.          crimp/cord end.            end
                                                                        tempers. Unless otherwise
To use, string a crimp tube         If you’re using a
                                                                        noted, wire used in this issue
and the connection finding          crimp end, crimp it as you                                                  simple loop
                                                                        is half-hard—the best temper
(i.e., the loop of the clasp).      would a crimp tube.
                                                                        for making strong loops and
                                    WireGuards provide a
Pass back through the tube,                                             other shapes.
                                    smooth metal channel to
leaving a short tail. Use the                                                                                To form a siMpLe Loop, use
                                    protect the stringing material
back notch of the crimping                                                                                   flat-nose pliers to make a 90°
                                    from chaffing
pliers to press the length of                                                                                bend at least 1/2" from the end
                                    against a con-
the tube down between the                                                                                    of the wire. Use round-nose
                                    nector. String
wires, enclosing them in sepa-                                                                               pliers to grasp the wire after
                                    a crimp tube,                                opening a jump ring
rate chambers of the crescent                                                                                the bend; roll the pliers
                                    then pass up
shape. Rotate the tube 90°                                                                                   toward the bend, but not past
                                    through one                         JuMp rinGs   connect holes
and use the front notch of                                                                                   it, to preserve the 90° bend.
                                    half of the                         and loops. Open a jump ring
the pliers to fold the two                            wireguard                                              Use your thumb to continue
                                    guard and                           by grasping each side of its
chambers onto themselves,                                                                                    the wrap around the nose of
                                    down the other                      opening with a pair of pliers;
forming a clean cylinder. Trim                                                                               the pliers. Trim the wire next
                                    half. Pass the guard and wire       don’t pull apart. Instead, twist
the excess wire.                                                                                             to the bend. Open a simple
                                    through the loop of the con-        in opposite directions so that
CriMp beads are serrated                                                                                     loop just as you would a jump
                                    nector, pass the wire back          you can open and close
metal beads. Twisted crimp                                                                                   ring.
                                    through the crimp tube, snug        without distorting the shape.
tubes and crimp beads can be
secured by squeezing them           the tube up to the guard, then
flat with chain- or flat-nose       crimp.
                                                                                                                    cone
pliers.
CriMp CoVers hide crimp
tubes and give a professional
finish. To attach, gently hold a
crimp cover
in the front
notch of the
crimping                                                                       head pins    eye pins         Use Cones to finish a multi-
pliers. Insert                                                                                               strand piece. Attach each
                                                                        head pins are straight wires
the crimped                                                                                                  strand of beads to a wrapped
                     placing a                                          with a flat disc, ball, or other     loop or an eye pin. Use the
tube and            crimp cover                                         shape at one end. eYe pins           wrapped-loop wire or eye pin
gently
                                                                        are straight wires that end in       to string the wide end of a
squeeze the pliers, encasing
                                                                        a loop.                              cone, covering the ends of the
the tube inside the cover.
                                                                                                             strands; form a wrapped loop
                                                                                                             at the tip of the cone that
                                                                                                             attaches to a clasp


                                                    For additional technique information,
                                                    including videos and illustrations,
                                                    visit beadingdaily.com and click on
                                                    the “glossary” tab.


                                        © 2010 Interweave. Not to be reprinted. All rights reserved.
                                                                     page 13

Weitere ähnliche Inhalte

Ähnlich wie 1010 bbj5 wire

Glass Pebble Cabochon Wire Wrapped Pendant Tutorial
Glass Pebble Cabochon Wire Wrapped Pendant Tutorial Glass Pebble Cabochon Wire Wrapped Pendant Tutorial
Glass Pebble Cabochon Wire Wrapped Pendant Tutorial The Beading Gem's Journal
 
Easy Wire and Bead Braided Bracelet Tutorial
Easy Wire and Bead Braided Bracelet TutorialEasy Wire and Bead Braided Bracelet Tutorial
Easy Wire and Bead Braided Bracelet TutorialThe Beading Gem's Journal
 
How to-make-beaded-clasp
How to-make-beaded-claspHow to-make-beaded-clasp
How to-make-beaded-claspcrazyleo74
 
Angel earrings tutorial
Angel earrings tutorialAngel earrings tutorial
Angel earrings tutorialEllen Roy
 
How to Make Dangle Crackle Pendant DIY Jewelry Making Tutorial
How to Make Dangle Crackle Pendant DIY Jewelry Making TutorialHow to Make Dangle Crackle Pendant DIY Jewelry Making Tutorial
How to Make Dangle Crackle Pendant DIY Jewelry Making TutorialHouseofGems.com
 
Exquisite Copper Wire Earrings With Crystal Beads
Exquisite Copper Wire Earrings With Crystal BeadsExquisite Copper Wire Earrings With Crystal Beads
Exquisite Copper Wire Earrings With Crystal BeadsHouseofGems.com
 
Wire Wrapped Sweetheart Round Cabochon Pendant
Wire Wrapped Sweetheart Round Cabochon PendantWire Wrapped Sweetheart Round Cabochon Pendant
Wire Wrapped Sweetheart Round Cabochon PendantThe Beading Gem's Journal
 

Ähnlich wie 1010 bbj5 wire (20)

Coiled gemdrops
Coiled gemdropsCoiled gemdrops
Coiled gemdrops
 
Egyptian Coil Earrings Tutorial
Egyptian Coil Earrings TutorialEgyptian Coil Earrings Tutorial
Egyptian Coil Earrings Tutorial
 
Double Wrap Wire Bangle Bracelet Tutorial
Double Wrap Wire Bangle Bracelet TutorialDouble Wrap Wire Bangle Bracelet Tutorial
Double Wrap Wire Bangle Bracelet Tutorial
 
Glass Pebble Cabochon Wire Wrapped Pendant Tutorial
Glass Pebble Cabochon Wire Wrapped Pendant Tutorial Glass Pebble Cabochon Wire Wrapped Pendant Tutorial
Glass Pebble Cabochon Wire Wrapped Pendant Tutorial
 
Easy Wire and Bead Braided Bracelet Tutorial
Easy Wire and Bead Braided Bracelet TutorialEasy Wire and Bead Braided Bracelet Tutorial
Easy Wire and Bead Braided Bracelet Tutorial
 
Bbpdf0404106
Bbpdf0404106Bbpdf0404106
Bbpdf0404106
 
Viking Knit Tutorial
Viking Knit TutorialViking Knit Tutorial
Viking Knit Tutorial
 
How to Wire Wrap a Coin Pendant
How to Wire Wrap a Coin PendantHow to Wire Wrap a Coin Pendant
How to Wire Wrap a Coin Pendant
 
How to-make-beaded-clasp
How to-make-beaded-claspHow to-make-beaded-clasp
How to-make-beaded-clasp
 
Charming dream hacker_web
Charming dream hacker_webCharming dream hacker_web
Charming dream hacker_web
 
Art on0208
Art on0208Art on0208
Art on0208
 
Leftover madness bead necklace
Leftover madness bead necklaceLeftover madness bead necklace
Leftover madness bead necklace
 
Orbital Earrings Tutorial
Orbital Earrings TutorialOrbital Earrings Tutorial
Orbital Earrings Tutorial
 
Gemstone Tassel Earrings tutorial
Gemstone Tassel Earrings tutorialGemstone Tassel Earrings tutorial
Gemstone Tassel Earrings tutorial
 
Angel earrings tutorial
Angel earrings tutorialAngel earrings tutorial
Angel earrings tutorial
 
How to Make Dangle Crackle Pendant DIY Jewelry Making Tutorial
How to Make Dangle Crackle Pendant DIY Jewelry Making TutorialHow to Make Dangle Crackle Pendant DIY Jewelry Making Tutorial
How to Make Dangle Crackle Pendant DIY Jewelry Making Tutorial
 
Ropework
RopeworkRopework
Ropework
 
Exquisite Copper Wire Earrings With Crystal Beads
Exquisite Copper Wire Earrings With Crystal BeadsExquisite Copper Wire Earrings With Crystal Beads
Exquisite Copper Wire Earrings With Crystal Beads
 
Wire Wrapped Sweetheart Round Cabochon Pendant
Wire Wrapped Sweetheart Round Cabochon PendantWire Wrapped Sweetheart Round Cabochon Pendant
Wire Wrapped Sweetheart Round Cabochon Pendant
 
Fanciful hoop earrings(2)
Fanciful hoop earrings(2)Fanciful hoop earrings(2)
Fanciful hoop earrings(2)
 

Mehr von Jose Miguel Lopez Garcia

ORDENANZA PARA LA PRESERVACIÓN, PROTECCIÓN Y FOMENTO AL DESARROLLO DE LA ACTI...
ORDENANZA PARA LA PRESERVACIÓN, PROTECCIÓN Y FOMENTO AL DESARROLLO DE LA ACTI...ORDENANZA PARA LA PRESERVACIÓN, PROTECCIÓN Y FOMENTO AL DESARROLLO DE LA ACTI...
ORDENANZA PARA LA PRESERVACIÓN, PROTECCIÓN Y FOMENTO AL DESARROLLO DE LA ACTI...Jose Miguel Lopez Garcia
 
El Artesano en el Codigo de Comercio de Venezuela / Chang Mora Kimlen y Salas...
El Artesano en el Codigo de Comercio de Venezuela / Chang Mora Kimlen y Salas...El Artesano en el Codigo de Comercio de Venezuela / Chang Mora Kimlen y Salas...
El Artesano en el Codigo de Comercio de Venezuela / Chang Mora Kimlen y Salas...Jose Miguel Lopez Garcia
 
La producción artesanal (Venezuela) / Bustos Flores , Carlos
La producción artesanal (Venezuela) / Bustos Flores , Carlos La producción artesanal (Venezuela) / Bustos Flores , Carlos
La producción artesanal (Venezuela) / Bustos Flores , Carlos Jose Miguel Lopez Garcia
 
Proyecto Ley de fomento y proteccion al desarrollo artesanal
Proyecto Ley de fomento y proteccion al desarrollo artesanalProyecto Ley de fomento y proteccion al desarrollo artesanal
Proyecto Ley de fomento y proteccion al desarrollo artesanalJose Miguel Lopez Garcia
 
Ley de-fomento-y-proteccion-al-desarrollo-artesanal año 93
Ley de-fomento-y-proteccion-al-desarrollo-artesanal año 93Ley de-fomento-y-proteccion-al-desarrollo-artesanal año 93
Ley de-fomento-y-proteccion-al-desarrollo-artesanal año 93Jose Miguel Lopez Garcia
 
Carta adhesion al sistema de Culturas Populares
Carta adhesion al sistema de Culturas PopularesCarta adhesion al sistema de Culturas Populares
Carta adhesion al sistema de Culturas PopularesJose Miguel Lopez Garcia
 
Gaceta oficial 39887 decreto dia del artesano
Gaceta oficial 39887 decreto dia del artesanoGaceta oficial 39887 decreto dia del artesano
Gaceta oficial 39887 decreto dia del artesanoJose Miguel Lopez Garcia
 
Proyecto de Ley de Fomento y Proteccion Artesanal de la republica Bolivariana...
Proyecto de Ley de Fomento y Proteccion Artesanal de la republica Bolivariana...Proyecto de Ley de Fomento y Proteccion Artesanal de la republica Bolivariana...
Proyecto de Ley de Fomento y Proteccion Artesanal de la republica Bolivariana...Jose Miguel Lopez Garcia
 

Mehr von Jose Miguel Lopez Garcia (20)

Presentación HUELLA ARTESANAL ccs 2023
Presentación HUELLA ARTESANAL ccs 2023Presentación HUELLA ARTESANAL ccs 2023
Presentación HUELLA ARTESANAL ccs 2023
 
ORDENANZA PARA LA PRESERVACIÓN, PROTECCIÓN Y FOMENTO AL DESARROLLO DE LA ACTI...
ORDENANZA PARA LA PRESERVACIÓN, PROTECCIÓN Y FOMENTO AL DESARROLLO DE LA ACTI...ORDENANZA PARA LA PRESERVACIÓN, PROTECCIÓN Y FOMENTO AL DESARROLLO DE LA ACTI...
ORDENANZA PARA LA PRESERVACIÓN, PROTECCIÓN Y FOMENTO AL DESARROLLO DE LA ACTI...
 
Ordenanza artesanal del municipio Chacao
Ordenanza artesanal del municipio ChacaoOrdenanza artesanal del municipio Chacao
Ordenanza artesanal del municipio Chacao
 
El Artesano en el Codigo de Comercio de Venezuela / Chang Mora Kimlen y Salas...
El Artesano en el Codigo de Comercio de Venezuela / Chang Mora Kimlen y Salas...El Artesano en el Codigo de Comercio de Venezuela / Chang Mora Kimlen y Salas...
El Artesano en el Codigo de Comercio de Venezuela / Chang Mora Kimlen y Salas...
 
La producción artesanal (Venezuela) / Bustos Flores , Carlos
La producción artesanal (Venezuela) / Bustos Flores , Carlos La producción artesanal (Venezuela) / Bustos Flores , Carlos
La producción artesanal (Venezuela) / Bustos Flores , Carlos
 
Proyecto Ley de fomento y proteccion al desarrollo artesanal
Proyecto Ley de fomento y proteccion al desarrollo artesanalProyecto Ley de fomento y proteccion al desarrollo artesanal
Proyecto Ley de fomento y proteccion al desarrollo artesanal
 
Ley de-fomento-y-proteccion-al-desarrollo-artesanal año 93
Ley de-fomento-y-proteccion-al-desarrollo-artesanal año 93Ley de-fomento-y-proteccion-al-desarrollo-artesanal año 93
Ley de-fomento-y-proteccion-al-desarrollo-artesanal año 93
 
Arte sano septiembre 2012
Arte sano septiembre 2012Arte sano septiembre 2012
Arte sano septiembre 2012
 
Carta adhesion al sistema de Culturas Populares
Carta adhesion al sistema de Culturas PopularesCarta adhesion al sistema de Culturas Populares
Carta adhesion al sistema de Culturas Populares
 
Arte sano noviembre 2012
Arte sano noviembre 2012Arte sano noviembre 2012
Arte sano noviembre 2012
 
Arte sano 01 noviembre2011
Arte sano 01 noviembre2011Arte sano 01 noviembre2011
Arte sano 01 noviembre2011
 
Arte sano 02 diciembre2011[1]
Arte sano 02 diciembre2011[1]Arte sano 02 diciembre2011[1]
Arte sano 02 diciembre2011[1]
 
El Artesan@
El Artesan@El Artesan@
El Artesan@
 
Gaceta oficial 39887 decreto dia del artesano
Gaceta oficial 39887 decreto dia del artesanoGaceta oficial 39887 decreto dia del artesano
Gaceta oficial 39887 decreto dia del artesano
 
Proyecto de Ley de Fomento y Proteccion Artesanal de la republica Bolivariana...
Proyecto de Ley de Fomento y Proteccion Artesanal de la republica Bolivariana...Proyecto de Ley de Fomento y Proteccion Artesanal de la republica Bolivariana...
Proyecto de Ley de Fomento y Proteccion Artesanal de la republica Bolivariana...
 
Bases generales Concurso Gran
Bases generales Concurso GranBases generales Concurso Gran
Bases generales Concurso Gran
 
Gran Explosion Bicentenaria Artesana
Gran Explosion Bicentenaria Artesana Gran Explosion Bicentenaria Artesana
Gran Explosion Bicentenaria Artesana
 
Step by step_wire_jewelry_vol.3_no.2_2007
Step by step_wire_jewelry_vol.3_no.2_2007Step by step_wire_jewelry_vol.3_no.2_2007
Step by step_wire_jewelry_vol.3_no.2_2007
 
Step by step_wire_jewelry_vol.1_no1
Step by step_wire_jewelry_vol.1_no1Step by step_wire_jewelry_vol.1_no1
Step by step_wire_jewelry_vol.1_no1
 
Sswf1210 web
Sswf1210 webSswf1210 web
Sswf1210 web
 

1010 bbj5 wire

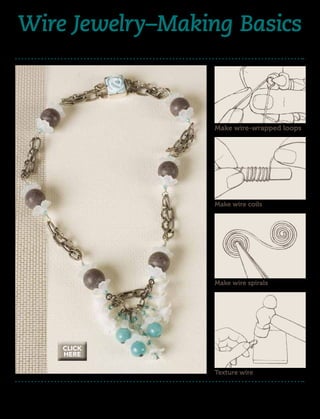
  • 1. Wire Jewelry–Making Basics 5 Wire Jewelry Projects Using 4 Easy Techniques Make wire-wrapped loops Make wire coils Make wire spirals click here Texture wire From the designers featured on Beads, Baubles, and Jewels THE #1 PUBLIC TELEVISION BEADING AND JEWELRY-MAKING SHOW
  • 2. Wire Jewelry—Making Basics 5 Wire Jewelry Projects Using 4 Easy Techniques 1 TECHNIQUE: wrapped loops 3 LUCITE BLUES NECKLACE MELINDA BARTA 5 TECHNIQUE: coils 6 FLOWER BOUQUET NECKLACE DERYA AKSOY 7 TECHNIQUE: spirals 8 ROSE GLOW NECKLACE JAMIE HOGSETT 9 TECHNIQUE: texture 10 FILIGREE LINK BRACELET JANICE BERKEBILE MIXED TECHNIQUES: 11 RINGS OF SATURN MARLENE BLESSING 12 TECHNIQUES © 2010 Interweave. Not to be reprinted. All rights reserved. page ii
  • 3. TECHNIQUE: wrapped loops 1 2 3 Wrapped Loops 1. To form a wrapped loop, make a 90° bend 4 at least 2" from the end of the wire. 2, 3. Holding the wire so that the bent piece is pointing toward you, grasp the wire after the bend with round-nose pliers and form a simple loop with a tail that overlaps the bend. 4. Hold the loop with flat- or chain-nose pliers and use another pair of pliers or your fingers to wrap the tail tightly down the neck of the 5 wire to create a couple of coils. 5. Trim the wire as closely to the neck of the wire as possible. 6. Use flat- or chain-nose pliers or the front notch of crimping pliers to softly press the remaining wire tail against the neck of the wire. 6 © 2010 Interweave. Not to be reprinted. All rights reserved. page 1
  • 4. How to: doubLe Wrapped Loops 7 To make a double wrapped loop, simply create a wrapped loop as usual, then use the tail wire to coil back up over the first coils, toward the loop; trim. Wrapped-Loop Links 7. To make a wrapped-loop link, form a wrapped loop on each end of a bead. Repeat with another bead, attaching one of the loops to a loop of the first link before coiling the tail down the neck of the wire. 8 Wrapped-Loop baiLs 8. Center the bead on a 3" or longer piece of wire. Bend both ends of the wire up the sides of the bead. 9, 10. Bend one end straight up at the center of the bead and the other horizontally, so that it is perpendicular to the first wire. Wrap the 9 horizontal wire around the straight-up wire to form a couple of coils. 11, 12. Form a wrapped loop with the straight-up wire, wrapping it back down over the already formed coils. 10 11 [ tips ] 12 • Use round- or flat-nose pliers to squeeze together the coils if you made them too far apart. © 2010 Interweave. Not to be reprinted. All rights reserved. page 2
  • 5. LUCITE BLUES NECKLACE MELINDA BARTA Flirty vintage Lucite flowers, classy glass and stone beads, and patinated chain evoke the sentiments of bygone times. © 2010 Interweave. Not to be reprinted. All rights reserved. page 3
  • 6. MateriaLs 4 clear/white 3mm fire-polished rounds 24 aqua 3mm fire-polished rounds 7 aquamarine 5×3mm faceted rondelles 3 amazonite 9mm faceted rounds 6 marbled gray 12mm vintage Lucite rounds 14 white matte 15×5mm vintage Lucite flowers 9 white matte 13×7mm vintage Lucite flowers 1 sterling silver 15×25mm 2-strand box clasp with aqua flower inlay 10 gunmetal 2" head pins 4 gunmetal 5mm jump rings 18" of sterling silver 24-gauge half-hard wire 71⁄2" of silver 6×11mm textured oval chain 8" of silver 4–5×4–6mm textured long- and-short chain tooLs Wire cutters Chain-nose pliers Round-nose pliers F i n i s h e d s i z e : 1 8 1⁄ 2" Strand Dangles round, 1 aqua round, 1 aquamarine 1: Cut the oval chain into six 1" pieces 8: Use a head pin to string the follow- rondelle, 1 aqua round, and 1 clear/ and one 11⁄2" piece. Cut the long- ing bead sequences, then form a white round. and-short chain into six 1" pieces simple loop: and one 2" piece. 9: Attach dangles to the 2" piece of 2: Use 1 jump ring to attach 1 piece of Dangle A: one 13x7mm flower. long-and-short chain in the center of 1" oval chain to one loop of one half Repeat. the necklace by opening and closing of the clasp. Repeat using 1 piece Dangle B: one 13x7mm flower and the simple loops as you would of 1" long-and-short chain and the 1 aqua round. Repeat. jump rings and placing the longest other loop of the same half of the Dangle C: one 13x7mm flower, dangles at the center and the short- clasp. 1 aquamarine rondelle, and 1 aqua est at the ends of the chain. 3: Use 3" of wire to form a wrapped round. loop that attaches to the free ends Dangle D: 1 amazonite round, one of both chains from the previous 13x7mm flower, and 1 aqua round. step; string 1 aqua round, one Dangle E: one 13×7mm flower, 1 aqua- 15×5mm flower, 1 gray round, one marine rondelle, 1 clear/white round, 15×5mm flower, and 1 aqua round. and 1 aqua round. Form a wrapped loop that attaches Dangle F: 1 amazonite round, one to the end of 1 piece of 1" oval 15×5mm flower, 1 aquamarine ron- chain and 1 piece of 1" long-and- delle, and 1 aqua round. short chain. Dangle G: 1 amazonite round, one 4: Repeat Step 3. 15×5mm flower, one 13×7mm flower, 5: Repeat Step 3 using the 1 1⁄2" piece 1 aquamarine rondelle, 1 clear/white of oval chain and the 2" piece of round, and 1 aqua round. long-and-short chain. Dangle H: 1 aqua round, 1 aquama- 6: Repeat Step 3 three times. rine rondelle, one 13×7mm flower, 7: Repeat Step 2 to attach the free ends 1 aqua round, 1 aquamarine ron- of the last chains used to the clasp. delle, 1 aqua round, 1 clear/white ResouRces: Check your local bead shop or contact: Clasp: Jess Imports (wholesale only), (415) 626-1433, www.jessimports.com. Chain: AD Adornments, kathyd33@yahoo.com, www.adadornments.com. Wire, head pins, and jump rings: Fusionbeads.com, (888) 781-3559. Lucite rounds and flowers: Art & Soul Beads, (812) 285-0000, www.artandsoulbeads.com. Fire-polished and amazonite rounds: Let It Bead, (303) 788-1466. Aquamarine rondelles: Desert Gems, (303) 426-4411, www.desertgemsinc.com. © 2010 Interweave. Not to be reprinted. All rights reserved. page 4
  • 7. TECHNIQUE: coils How to: 1. To make a coil, use one hand to hold 2. To remove the coil, slide it off the the end of your wire against a mandrel mandrel. Add a simple loop on (or whatever object you want to coil either end to use the coil as is or around). With the other hand, wrap cut the coil to make jump rings or the wire around the mandrel. split rings. 1 2 [ tips ] COILING GIzMO For fast, easy coils, use a Coiling Gizmo, a tool with which you make coils on a coiling rod by turning a hand crank. (If using this tool, see the manufacturer’s manual for detailed instructions.) © 2010 Interweave. Not to be reprinted. All rights reserved. page 5
  • 8. FLOWER BOUQUET NECKLACE DERYA AKSOY Derya turns beaded head pins into a cute bouquet pendant that’s easy to make and fun to wear. MateriaLs Flowers to coil the other end of the eye pin 11 light Siam AB 4mm crystal bicones 1: Use a head pin to string 1 crystal. Use around the head-pin coils. Gently 1 brass 5×7mm lobster clasp flat-nose pliers to fold the last 1⁄8" of curve the flower ends of the head 13 brass 11⁄2" 22-gauge head pins the head pin onto itself. Repeat ten pins with your fingers to open up times for a total of 11 flowers. the bouquet. 1 brass 11⁄2" 22-gauge eye pin 1 brass 5mm jump ring Bouquet Necklace 1 brass 6mm jump ring 3: Attach the eye pin to the center link 2: Hold the flowers together in a bunch, 161⁄2" of brass 2mm chain pushing the crystals to the head ends of the chain as you would a jump of the pins and staggering the “stems” ring. Use the 5mm jump ring to tooLs to give the bouquet a more natural attach the lobster clasp to one end Round-nose pliers look. Use flat-nose pliers to coil a head of the chain. Attach the 6mm jump Flat-nose pliers pin around the middle of the bouquet; ring to the other end of the chain. repeat with another head pin. Hold the eye pin behind the center coils of ResouRces: Check your local bead shop Finished size: 17" the bouquet with the eye end about or contact: Crystals and similar brass find- 1 ⁄4" above the coils; use flat-nose pliers ings: Fusionbeads.com, (888) 781-3559. © 2010 Interweave. Not to be reprinted. All rights reserved. page 6
  • 9. TECHNIQUE: spirals oXidizinG How to: 1. To start a spiral (or scroll), make a small loop at the end of a wire with round-nose pliers. 2. Enlarge the piece by holding onto the spiral with chain-nose pliers and pushing the wire over the previous spiral with your fingers for as many revolutions as desired. 3. If desired, bend the tail wire 90° at the top 1 of the spiral. Use as a head pin or form a simple loop to attach to other items. s-shaped doubLe spiraLs 4. To create double spirals in the form of an S, scroll one to the center of the wire. 5. Repeat on the other end of the wire, spiraling 2 the wire in the opposite direction. 3 5 4 © 2010 Interweave. Not to be reprinted. All rights reserved. page 7
  • 10. ROSE GLOW NECKLACE JAMIE HOGSETT Spiral drops dress up foil-lined coins in this chunky wrapped-loop necklace. MateriaLs 1: Use 3" of silver wire to form a double- 6: Attach 8" of beading wire to one 1 g eggplant matte size 11° seed beads wrapped loop; string 1 purple round of the wrapped loops formed in 5 purple 18mm faceted glass rounds and form a double-wrapped loop. Step 5 using a crimp tube. String 4 purple foil-lined 28mm glass coins 2: Use 6" of silver wire to form a 61⁄2" of seed beads, 1 crimp tube, wrapped loop that attaches to the and the other wrapped loop formed 2 sterling silver 6×16mm cones previous double-wrapped loop, in Step 5; pass back through the tube 1 sterling silver 12mm toggle clasp leaving a 2" tail after wrapping; string and crimp. Repeat entire step twice. 6 sterling silver 2mm crimp tubes 1 coin and form a wrapped loop, 7: Use one of the wrapped-loop wires to 24" of .019 beading wire leaving another 2" tail. Use the 2" string the wide end of 1 cone and form 45" of silver 22-gauge wire tails to form spirals that rest on top a double-wrapped loop that attaches of each side of the coin. to the bar half of the clasp. Repeat, tooLs 3: Use 3" of silver wire to form a double- attaching the double-wrapped loop Wire cutters wrapped loop that attaches to the to the first double-wrapped loop previous wrapped loop; string 1 formed in Step 1. Flat-nose pliers purple round and form a double- Round-nose pliers wrapped loop. ResouRces: Check your local bead shop Crimping pliers 4: Repeat Steps 2 and 3 three times, or contact: Seed beads: Beyond Beadery, attaching the last purple round to (800) 840-5548, www.beyondbeadery F i n i s h e d s i z e : 1 9 1⁄ 2" the ring half of the clasp before .com. Coins and rounds: Jo-Ann Fabric forming a double-wrapped loop. and Craft Stores, (888) 739-4120, www 5: Use 3" of silver wire to form a .joann.com. Cones and clasp: Bead Cache, wrapped loop; repeat. (970) 224-4322, www.bead-cache.com. © 2010 Interweave. Not to be reprinted. All rights reserved. page 8
  • 11. TECHNIQUE: texture How to: oXidizinG When you are pleased with the color, dip the metal into the cold water with To create the appearance of texture baking soda to stop the reaction, then by patinating metal (usually fine or rinse and dry. Brush, sand, or polish sterling silver) with liver of sulfur in the surface for interesting results. If either liquid or chunk form, follow you don’t like the patina, you can easily these instructions adapted from Kate remove it by sanding or brushing it. If McKinnon’s “Hot Wire” article in desired, seal your piece with any spray Beadwork magazine (June/July 2006). fixative meant for metal; unsealed Clean your metal piece with soap and pieces will age, develop more patina, or warm water if it is dirty or oily. become shiny with wear. Find four glass, stainless steel, or ceramic bowls. Fill the first with enough haMMerinG liver-of-sulfur solution to cover the piece Pounding wire not only creates great of metal: Liver of sulfur in liquid form is texture, but also strengthens metal. ready to use, but can be diluted; dissolve To hammer, place your wire on a steel the chunk form in water following bench block. Use the flat end of a the manufacturer’s instructions. Fill a chasing hammer to flatten the wire, then second bowl with very hot water (which use the ball end of the hammer to add speeds up the patination process) and texture. a third with cold water (which slows down the process). Fill the fourth bowl with cold water mixed with about a tablespoon of baking soda (which acts as a neutralizing agent). Use stainless steel tweezers or plastic or wood tongs to dip the metal into the liver-of-sulfur solution. Rinse in the hot [ tips ] or cold water. Continue to dip and rinse often to gradually build a patina. Lightly sand or brush the piece with a WORKING WITH LIVER OF SULFUR brass or wire brush, sandpaper, very fine • Take the following precautions when using liver of steel wool, or other abrasive between sulfur: keep it away from acids, wear gloves to avoid dips to give more depth to the patina—a contact with the skin, and work in a well-ventilated textured surface picks up more patina than a smooth surface. area since the fumes are toxic. • Store both liquid and chunk forms of liver of sulfur in tightly sealed light- and air-proof containers. © 2010 Interweave. Not to be reprinted. All rights reserved. page 9
  • 12. FILIGREE LINK BRACELET JANICE BERKEBILE Hammer, spiral, and link—that's all it takes to make Janice's gorgeous spiral-link bracelet. MateriaLs Filigree links Clasp 12 sterling silver 6mm jump rings 1: Cut five 5" pieces of copper wire, one 3" 5: Repeat Step 2 with the 3" copper wire. Use 2 sterling silver 8mm jump rings piece of copper wire, and five 3" pieces round-nose pliers to form a small spiral at 15" of sterling silver 22-gauge wire of silver wire. each end of the wire, rolling each spiral 28" of copper 16-gauge wire 2: Use the flat end of the hammer to flatten toward the center, but in opposite direc- 1 ⁄4" on both ends of each piece of copper tions from each other. Grasp the wire with wire, creating a paddle on each end. the widest (back) end of the long round- tooLs 3: Use each piece of copper wire to make a nose pliers about 1⁄4" from one spiral, with Flush cutters loosely wrapped S-shaped double-spiral the spiral facing up. Press the wire around Round-nose pliers link. Hammer the outside edges of each the nose of the pliers to form a hook shape. Chain-nose pliers link with the flat end of the hammer, then Repeat in the opposite direction at the other Long round-nose pliers with the ball end. end of the wire to form an S. Hammer the Chasing hammer rounded ends of the clasp with the flat end Coiling of the hammer, then with the ball end. Bench block 4: Using 1 piece of silver wire and, leaving Pounding pad a 1⁄ 2" tail, form three coils around the Bracelet assembly center of 1 link. If necessary, use chain- 6: Use two 6mm jump rings to attach one F i n i s h e d s i z e : 7 1⁄ 4" nose pliers to bunch the coils together end of 1 link to one end of another link. tightly. Trim each end to 1⁄2" and use the Repeat three times. Use two 6mm jump ends to form tight spirals that roll toward rings to attach one of the end links to the the center of the link. Repeat entire step clasp. Connect the two 8mm jump rings with the remaining links. Gently curve and use two 6mm jump rings to attach each link with your fingers to wrap gently one of them to the other end link. around the wrist. 7: If desired, patinate the bracelet using liver of sulfur. ResouRces: Check your local bead shop or contact: Jump rings and wire: Quiltworks Northwest, (425) 453-6005, www.quiltworksnw.com. © 2010 Interweave. Not to be reprinted. All rights reserved. page 10
  • 13. RINGS OF SATURN MARLENE BLESSING The planetary look of these borosilicate rondelles, coupled with the glass pendant, make this a truly galactic necklace. All it takes is a little stringing, a couple of jump rings, and some twists of wire! © 2010 Interweave. Not to be reprinted. All rights reserved. page 11
  • 14. MateriaLs 8 assorted 14×8mm borosilicate (boro) rondelles 1 purple 22mm lampworked glass disc 1 red-and-orange 38mm lampworked glass disc 12 Thai silver 9×6mm spacers 6 Thai silver 6×55mm hammered noodles 1 sterling silver 15mm toggle clasp 2 sterling silver 10mm jump rings 28" of dark red 2mm leather cord 12" of sterling silver 22-gauge half-hard wire 10" of sterling silver 20-gauge half-hard wire tooLs Round-nose pliers Chain-nose pliers Wire cutters F i n i s h e d s i z e : 2 4 " p L u s 1 7⁄ 8" p e n d a n t Pendant 1: Use 5" of 20-gauge wire to form a wrapped loop. Use the other end of the wire to string the 38mm and 22mm discs, then make a 90° bend 3⁄4" from the base of the wrapped loop. Use the end of the wire to form a spiral that rests on top of the 22mm disc. 2: Form a spiral on one end of 5" of 20-gauge wire, then string the two discs, front side first. Press the spiral flat on top of the 22mm disc. Use the other end of the wire at the back of the discs to wrap around the neck of the wrapped-loop wire, then bring the wire to the front of the discs, wrap it around one of the spirals formed previously, and form a small spiral at the end of the wire. Necklace strand 3: Use the cord to string 1 boro, 1 spacer, 1 noodle, and 1 spacer three times. String 1 boro. 4: String the wrapped loop formed in Step 1. 5: Repeat Step 3, reversing the stringing sequence. 6: Center all the beads on the cord. Fold one of the cord ends in half, then use 6" of 22-gauge wire to make about 17 coils around the cord end to secure the cord loop; repeat with the other cord end. 7: Use 1 jump ring to attach one half of the clasp to one of the cord loops; repeat with the other half of the clasp and cord loop. ResouRces: Contact your local bead shop or contact: Borosilicate rondelles and glass discs: Bokamo Designs, (913) 648-4296, www .bokamodesigns.com. Thai silver noodles and spacers: Somerset Silver (wholesale only), (425) 641-3666, www.somerset-silver.com. Jump rings: Via Murano, (877) 842-6872, www.viamurano.com. Leather cord: Leather Cord USA, (877) 700-2673, www.leather cordusa.com. © 2010 Interweave. Not to be reprinted. All rights reserved. page 12
  • 15. Techniques flush/wire To explore stringing further, consult Getting Started Stringing Beads and Stringing Style (both from Interweave). cutters Crimping CriMp/Cord ends Wireworking consist of a loop MetaL Wire comes in many attached to a tube. finishes and gauges. The Dab the leather, lower the gauge number, the plastic, ribbon, or crimp tube thicker the wire. The hardness other cord with or softness of wire is called are seamless jewelry glue, then CriMp tubes “temper.” Most wire comes in metal tubes used to secure place it in the crimp/cord dead-soft, half-hard, and hard the end of a beading wire. crimp/cord end. end tempers. Unless otherwise To use, string a crimp tube If you’re using a noted, wire used in this issue and the connection finding crimp end, crimp it as you simple loop is half-hard—the best temper (i.e., the loop of the clasp). would a crimp tube. for making strong loops and WireGuards provide a Pass back through the tube, other shapes. smooth metal channel to leaving a short tail. Use the To form a siMpLe Loop, use protect the stringing material back notch of the crimping flat-nose pliers to make a 90° from chaffing pliers to press the length of bend at least 1/2" from the end against a con- the tube down between the of the wire. Use round-nose nector. String wires, enclosing them in sepa- pliers to grasp the wire after a crimp tube, opening a jump ring rate chambers of the crescent the bend; roll the pliers then pass up shape. Rotate the tube 90° toward the bend, but not past through one JuMp rinGs connect holes and use the front notch of it, to preserve the 90° bend. half of the and loops. Open a jump ring the pliers to fold the two wireguard Use your thumb to continue guard and by grasping each side of its chambers onto themselves, the wrap around the nose of down the other opening with a pair of pliers; forming a clean cylinder. Trim the pliers. Trim the wire next half. Pass the guard and wire don’t pull apart. Instead, twist the excess wire. to the bend. Open a simple through the loop of the con- in opposite directions so that CriMp beads are serrated loop just as you would a jump nector, pass the wire back you can open and close metal beads. Twisted crimp ring. through the crimp tube, snug without distorting the shape. tubes and crimp beads can be secured by squeezing them the tube up to the guard, then flat with chain- or flat-nose crimp. cone pliers. CriMp CoVers hide crimp tubes and give a professional finish. To attach, gently hold a crimp cover in the front notch of the crimping head pins eye pins Use Cones to finish a multi- pliers. Insert strand piece. Attach each head pins are straight wires the crimped strand of beads to a wrapped placing a with a flat disc, ball, or other loop or an eye pin. Use the tube and crimp cover shape at one end. eYe pins wrapped-loop wire or eye pin gently are straight wires that end in to string the wide end of a squeeze the pliers, encasing a loop. cone, covering the ends of the the tube inside the cover. strands; form a wrapped loop at the tip of the cone that attaches to a clasp For additional technique information, including videos and illustrations, visit beadingdaily.com and click on the “glossary” tab. © 2010 Interweave. Not to be reprinted. All rights reserved. page 13