SlideShare ist ein Scribd-Unternehmen logo
1 von 31
Downloaden Sie, um offline zu lesen
Page 1 of 31
Corel Draw X6 Tutorial – New Product Flyer www.flyertutor.com
This tutorial gives the illustrated step by step instructions to create a NEW PRODUCT FLYER using the
PROFESSIONAL GRAPHIC DESIGN APPLICATION - Corel Draw X6.
Visit www.FlyerTutor.com for more Corel Draw Tutorials and Free Templates.
Steps
01: Document Setup
02: Create Rectangle
03: Convert to Curves
04: Shape Tool - Delete Nodes
05: Adjust Control Handles
06: Duplicate Shape
07: Mirror Image
08: Add Fill & Outline Color
09: Arrange Order
10: Shaping
11: Break Curve Apart
12: Adjust Triangular Handle
13: CMYK to RGB Color
14: Set RGB Color Values
15: Create Rounded Rectangle
16: Convert to Bitmap
17: Set Gaussian Blur
18: Royalty Free Images
19: Insert Images
20: Crop Images
21: Basic Shapes Tool - Heart
22: Free Fonts
23: Insert Text On A Path
24: Mirror Text
25: Format Text
26: Set Gradient With Fountain Fill
27: Set Outline Width
28: Add Remaining Text
29: Adjust Leading/Line Spacing
30: Save File
Corel Draw X6 New Product Flyer
Page 2 of 31
Corel Draw X6 Tutorial – New Product Flyer www.flyertutor.com
Step 01: Document Setup
To create a new document, go up to the MENU BAR and select FILE
> NEW.
This opens the CREATE A NEW DOCUMENT WINDOW.
Corel Draw X6 Create New Document Window
Make sure that SIZE is set to LETTER, and I've changed the PRIMARY COLOR MODE to RGB instead
of CMYK.
Click OK.
Step 02: Create Rectangle
Select the RECTANGLE TOOL from the TOOLBOX to the left of the screen.
Corel Draw X6 File Menu New
Corel Draw X6
Rectangle Tool
Page 3 of 31
Corel Draw X6 Tutorial – New Product Flyer www.flyertutor.com
Draw a RECTANGLE on the page.
On the RECTANGLE TOOL CONTROL BAR, set the RECTANGLE HEIGHT to 6.1" and
WIDTH to 7.1" by typing in the OBJECT SIZE BOXES.
Step 03: Convert to Curves
With the RECTANGLE still selected, right click over it to reveal a
menu.
Select CONVERT TO CURVES.
Step 04: Shape Tool - Delete Nodes
Select the SHAPE TOOL from the TOOLBOX.
Corel Draw X6 Rectangle
Corel Draw X6 Convert To Curves
Corel Draw X6
Shape Tool
Page 4 of 31
Corel Draw X6 Tutorial – New Product Flyer www.flyertutor.com
The RECTANGLE will now have 4 TINY NODES at each corner.
While holding down your mouse button, drag your cursor over the 2
RIGHT NODES, top and bottom.
They will turn to BLUE SQUARES once selected.
On the TOOL CONTROL BAR, select the DELETE NODES ICON.
Once the Nodes are deleted, the shape changes.
Corel Draw X6 Rectangle with 4 Nodes
Corel Draw X6 Rectangle with 2
Selected Nodes
Corel Draw X6
Delete Nodes Icon
Corel Draw X6 Oval Shape
Page 5 of 31
Corel Draw X6 Tutorial – New Product Flyer www.flyertutor.com
Step 05: Adjust Control Handles
To change the curve of the shape, select
either of the remaining 2 Nodes.
You will see 2 CONTROL HANDLES (SOLID BLUE
ARROWHEADS).
Decrease the distance between the CONTROL
HANDLES by dragging each Handle closer to the
other.
Select the TOP LEFT NODE and drag to the TOP
LEFT CORNER of the page.
Select the PICK TOOL then click on the shape.
Corel Draw X6 Shape with Adjusted Control Handles
Corel Draw X6 Control Handle
Corel Draw X6 Shape Control Handles
Corel Draw X6
Pick Tool
Page 6 of 31
Corel Draw X6 Tutorial – New Product Flyer www.flyertutor.com
Step 06: Duplicate Shape
Next we will create a DUPLICATE of this shape.
Go to the MENU BAR and select EDIT > DUPLICATE, or you can hold
down your CTRL and D keys together.
An exact copy of your shape will appear.
Step 07: Mirror Image
On the TOOL CONTROL BAR select the MIRROR HORIZONTALLY ICON to flip the shape.
Corel Draw X6 Edit Menu Duplicate
Corel Draw X6 Duplicate Shape
Corel Draw X6 Mirror
Horizontally Icon
Page 7 of 31
Corel Draw X6 Tutorial – New Product Flyer www.flyertutor.com
Move the Duplicate Shape so that it lines up with the bottom of
the page.
Then alternate between the PICK TOOL and SHAPE TOOL to make
adjustments to the size of the 2 shapes.
The Duplicate Shape should be slightly smaller than the original.
Step 8: Add Fill & Outline Color
Now, to make the shapes a little easier to work with, let's add some Color to them.
You can select both shapes by dragging the cursor over them while holding down the
mouse button.
On the right side of the screen will be the COLOR PALETTE.
Select any color you choose.
Simply click on your desired color in order to FILL the
shape and right click over the same color to set the
STROKE/OUTLINE of the shape.
Corel Draw X6 Flipped Shape
Corel Draw X6
Color Palette
Segment
Corel Draw X6 Fill and Stroke Color Applied
Page 8 of 31
Corel Draw X6 Tutorial – New Product Flyer www.flyertutor.com
Step 09: Arrange Order
Using the RECTANGLE TOOL again, draw a RECTANGLE that completely covers the
page, including the 2 shapes.
Set its FILL COLOR to something different so that you are able to distinguish
between the 2 layers.
Now we will send this layer behind the first by changing the Order.
On the MENU
BAR select ARRANGE > ORDER
> TO BACK OF PAGE.
Step 10: Shaping
Select both blue shapes. Do this by selecting 1 then hold down the SHIFT
KEY and select the other.
We will merge these 2 shapes together so that they become 1 shape.
Corel Draw X6 Gray Rectangle
Corel Draw X6 Ordered Layers
Corel Draw X6 Arrange Order Back Of Page
Page 9 of 31
Corel Draw X6 Tutorial – New Product Flyer www.flyertutor.com
On the MENU BAR select ARRANGE >
SHAPING > WELD.
Drag the cursor over the entire
page to again select both layers.
Go back to the SHAPING MENU and
this time select BACK MINUS FRONT.
Your new shape should look something like this one.
Select this new layer and repeat Step 06 to
create a DUPLICATE.
Corel Draw X6 Arrange Shaping Weld
Corel Draw X6 Shaping Back Minus Front
Corel Draw X6 Shaping
Back Minus Front Cutout
Corel Draw X6
Duplicated Layers
Page 10 of 31
Corel Draw X6 Tutorial – New Product Flyer www.flyertutor.com
Step 11: Break Curve Apart
We will break this shape apart by going to the MENU
BAR and selecting ARRANGE > BREAK CURVE APART.
Now you'll be able to
freely move each piece
around.
Remember to change the color so that it will be easier for you
to spot which layer you are working with.
Move the top shape directly above the back layer.
Do the same for the bottom shape.
Corel Draw X6 Arrange Break Curve Apart
Corel Draw X6 Broken Curve
Corel Draw X6 2 Shapes
Page 11 of 31
Corel Draw X6 Tutorial – New Product Flyer www.flyertutor.com
Select both shapes, and repeat Step 09 to Set Order,
sending them to BACK OF LAYER.
Then using the Arrow keys on your keyboard, move the shape
downward until it is in the desired location on the flyer.
Click any white area to deselect both shapes, then reselect
the bottom shape and move upward to desired location.
Step 12: Adjust Triangular Handle
Notice there is still some white space separating the 2 layers at
the corner.
To remedy this, select the SHAPE TOOL, then click on the 2ND LAYER
and drag the BLUE TRIANGULAR HANDLE upward to meet the top
layer.
Repeat this for the shape at the
bottom of the page but select
the BLUE SQUARE HANDLE instead
and drag downward toward the
1st layer.
Corel Draw X6 Order Back of Layer
Corel Draw X6 Adjust Second Layer
Corel Draw X6 New Product Flyer Background
Page 12 of 31
Corel Draw X6 Tutorial – New Product Flyer www.flyertutor.com
Step 13: CMYK to RGB
Color
Next we will set the color for
each layer.
To open the COLOR DOCKER go
up to the MENU BAR and
select WINDOW > DOCKERS >
COLOR.
Corel Draw X6 Color Window Docker
Page 13 of 31
Corel Draw X6 Tutorial – New Product Flyer www.flyertutor.com
The COLOR DOCKER will appear on the right side of the
screen.
Click on the down arrow to the right of CMYK and change
to RGB.
Step 14: Set RGB Color Values
Change R to 128, G to 0 and B to 0. Then click on the NEW COLOR on the
top left of the COLOR DOCKER to apply to shape.
You can also select the FILL and OUTLINE buttons at the bottom of the
Docker.
Set the top layer to our GREEN COLOR -
R to 153, G to 204 and B to 153.
Then select FILL and OUTLINE.
Corel Draw X6 Color Docker CMYK
Corel Draw X6 Color Docker RGB
Corel Draw X6 Layer with Color
Corel Draw X6 Layers with Color
Page 14 of 31
Corel Draw X6 Tutorial – New Product Flyer www.flyertutor.com
Step 15: Create Rounded Rectangle
Draw a Rectangle, setting its dimensions to WIDTH 1.6" and HEIGHT 1.75".
To round the corners of this rectangle, select the ROUND CORNER ICON on the TOOLS CONTROLS BAR.
Make sure that the EDIT CORNERS TOGETHER ICON is also
selected, then set the CORNER RADIUS to 0.5".
Now you can set the FILL and OUTLINE COLOR of the Rectangle by selecting
the RED COLOR that was already used.
If you look at the bottom of the screen you will see a COLOR PALETTE called
the DOCUMENT PALETTE.
It shows all the previously used colors
within the document, this way you don’t have
the trouble of re-entering all those color values again.
Corel Draw X6
Round Corner Icon
Corel Draw X6 Edit Corners Together Icon
Corel Draw X6
Rounded Rectangle
Corel Draw X6 Red
Rounded Rectangle
Corel Draw X6 Document Palette
Page 15 of 31
Corel Draw X6 Tutorial – New Product Flyer www.flyertutor.com
Step 16: Convert To Bitmap
Now we're going to have to add a GAUSSIAN BLUR to this shape.
With the Rectangle selected, go up to the MENU BAR and
select BITMAPS > CONVERT TO BITMAP.
A CONVERT TO
BITMAP WINDOW
appears.
Click OK.
Corel Draw X6 Bitmaps Convert to Bitmap
Corel Draw X6 Convert to Bitmap Window
Page 16 of 31
Corel Draw X6 Tutorial – New Product Flyer www.flyertutor.com
Step 17: Set Gaussian Blur
Go back to the BITMAP MENU and
select BLUR > GAUSSIAN BLUR.
This opens the GAUSSIAN BLUR WINDOW.
Set the RADIUS to 20 then click OK.
DUPLICATE this shape.
Recreate a smaller WHITE RECTANGLE and place inside each of the RED
RECTANGLES.
Set WIDTH to 1.55" and HEIGHT to 1.7".
Then set CORNER ROUNDNESS to 0.258".
Create a DUPLICATE of this shape and place on top of the other RED RECTANGLE.
Corel Draw X6 Bitmaps Gaussian Blur
Corel Draw X6 Gaussian Blur Window
Corel Draw X6 Rectangle
with Gaussian Blur
Corel Draw X6 White
Rectangle with Red
Background
Page 17 of 31
Corel Draw X6 Tutorial – New Product Flyer www.flyertutor.com
Draw another Rectangle with the following Dimensions: WIDTH
3.55" and HEIGHT 3.8".
Set its CORNER ROUNDNESS to 0.6".
Set its FILL and OUTLINE COLOR to our already used GREEN.
Repeat the process to set
the GAUSSIAN BLUR.
Draw another WHITE RECTANGLE to place above the GREEN
RECTANGLE setting WIDTH to 3.25" and HEIGHT to 3.5".
Set CORNER ROUNDNESS to 0.55".
Corel Draw X6 Rectangle
Before Gaussian Blur
Corel Draw X6 Rectangle
After Gaussian Blur
Corel Draw X6 New Product
Flyer Colored Background
Page 18 of 31
Corel Draw X6 Tutorial – New Product Flyer www.flyertutor.com
Step 18: Royalty Free Images
Now you are ready to add images.
The images for this Corel Draw New Products Flyer were downloaded from Public Domain Pictures.
This site hosts Royalty Free Public Doman Images. You are free to download and use images for
both Commercial and Personal Use. Visit the FlyerTutor Blog posts on Royalty Free Stock
Photography and Royalty Free Vector Clip Art to find out more.
The top image is called WHITE TEDDY BEAR and can be found here.
The bottom image is called TEDDY BEAR and can be found here.
The image of the 2 bears is called TEDDY BEARS and can be found here.
All 3 images were taken by Petr Kratochvil.
Step 19: Insert Images
Once you have downloaded the images, you will need to place
them into the flyer.
Starting with the WHITE TEDDY BEAR, go to the MENU BAR and
select FILE > IMPORT.
This opens the IMPORT WINDOW.
Corel Draw X6 File Menu Import
Corel Draw X6 Import Window
Page 19 of 31
Corel Draw X6 Tutorial – New Product Flyer www.flyertutor.com
Browse to where you saved the file.
Select it and then click IMPORT on the bottom right of the window.
You will see the IMAGE NAME along with some more details about the image next to your cursor.
Click anywhere on the screen to place the image.
Step 20: Crop Images
With the image selected, click the SHAPE TOOL ICON on the TOOLBOX.
The 8 BLACK SQUARE HANDLES around your image will change to 4 NODES.
Select a NODE and drag INWARDS toward the image without cutting off
any part of it and then release.
Continue to move each NODE where necessary.
Corel Draw X6 Image Name
Corel Draw X6 White Bear
with 8 Handles
Corel Draw X6 White Bear
with 4 Nodes
Corel Draw X6 White Bear
Move 1st Node
Corel Draw X6 White Bear
Move 2nd Node
Corel Draw X6 White Bear
Move 3rd Node
Corel Draw X6 White Bear
Move 4th Node
Page 20 of 31
Corel Draw X6 Tutorial – New Product Flyer www.flyertutor.com
Select the WHITE BEAR and change the SCALE FACTOR of the Image
setting both the WIDTH and HEIGHT to 60%.
You may be wondering what's the
difference if the Background of
the Image is White anyway?
Let's just say it will be slightly
easier to work with one over the
other.
Place the newly cropped image in the WHITE BOX.
Repeat the steps to add the other 2 Images, crop them and place them
where they need to be.
Set the SCALE FACTOR for the GRAY BEAR to 65% and the image
of the 2 BEARS to120%.
Corel Draw X6 White Bear
Scale Factor
Corel Draw X6 Smaller White
Bear Image With 4 Handles
Corel Draw X6 White Bear
Image With 4 Handles
Corel Draw X6 Placed Image
Corel Draw X6 New Product
Flyer with Images
Page 21 of 31
Corel Draw X6 Tutorial – New Product Flyer www.flyertutor.com
Step 21: Basic Shapes Tool - Heart
Next we will add some Hearts to the Flyer.
On the TOOLBOX, select the BASIC SHAPES TOOL.
On the TOOL CONTROLS BAR you'll see what looks like a PARALLELOGRAM. Click on
the down arrow on the right and select the HEART ICON from the menu that
appears.
While holding down your CTRL key, draw a HEART on the screen, this gives you
a proportional image.
On the TOOL CONTROLS BAR set its WIDTH and HEIGHT to 0.6".
Create a DUPLICATE and move into place on the flyer.
Adjust the dimensions of the 2ND
DUPLICATE to WIDTH and HEIGHT 0.4".
Create 3 DUPLICATES and move them into place on the flyer.
Adjust the dimensions of the 3RD
DUPLICATE to WIDTH and HEIGHT 0.2" and place on the flyer.
Place 4 HEARTS on the RED LAYER.
Set their WIDTH and HEIGHT to 0.3".
Corel Draw X6
Basic Shapes Tool
Corel Draw X6 Perfect
Shapes Window
Corel Draw X6 New Product Flyer with Hearts
Page 22 of 31
Corel Draw X6 Tutorial – New Product Flyer www.flyertutor.com
Repeat the steps to apply color, set the HEARTS on the WHITE
BACKGROUND to SOLID RED and the HEARTS on the RED
BACKGROUND to SOLID WHITE.
You can set each Heart's color 1 by 1, or hold down the SHIFT
Key and select each Heart that you need to apply the change
to.
You can also drag your cursor over all the Hearts you wish to
select at once, just be careful not to select any other
shapes.
Then set the WHITE HEARTS.
Next we will apply text to the Flyer, starting with
the GRADIENT FILLED TITLE.
Step 22: Free Fonts
For the NEW PRODUCT FLYER TITLE, ADDRESS and PRODUCT NAME, the
FONT used is NOT MARY KATE by Nick's Fonts, which was downloaded
from FontSpace.com.
If you want to view more of Nick's Fonts check out his website
at www.nicksfonts.com.
For the remaining text I used a Font called GABRIELLE. It can be
downloaded from FontFreak.com and is designed by Dieter Steffmann.
(Note for a newly downloaded Font to be usable on your machine, you must first install it.
Any FONT installed while COREL DRAW is open, will not be visible in the FONT LIST. To correct this,
you will have to restart the COREL DRAW program after Font(s) installation.)
Corel Draw X6 Hearts with Color Applied
NotMaryKate Font
Gabrielle Font
Page 23 of 31
Corel Draw X6 Tutorial – New Product Flyer www.flyertutor.com
Step 23: Insert Text on a Path
Select the TEXT TOOL from the TOOLBOX.
Notice that the cursor changes to an X with an A. Move the cursor over the edge of the TOP RED
LAYER. The cursor changes to an uppercase I and the word 'EDGE'.
When you see this, it means that you are on the edge of the layer. Click there and start typing 'NEW
PRODUCTS'.
OK, so the TEXT appears upside down.
This can be easily remedied.
Step 24: Mirror Text
Go up to the TOOLS CONTROL BAR and select the MIRROR TEXT VERTICALLY ICON.
The TEXT is now right side up, however it is facing the wrong direction.
Click on the MIRROR TEXT HORIZONTALLY ICON.
The TEXT will now be right side up.
Corel Draw X6
Text Tool
Corel Draw X6
Upside Down Text
Corel Draw X6
Mirror Text
Vertically Icon
Corel Draw X6 Text
Mirrored Vertically
Corel Draw X6
Mirror Text Icon
Corel Draw X6 Text
Right Side Up
Page 24 of 31
Corel Draw X6 Tutorial – New Product Flyer www.flyertutor.com
Step 25: Format Text
Triple click to select all TEXT.
On the TOOLS CONTROL BAR select the down
arrow on the FONT LIST and choose
the NOTMARYKATE FONT.
The box on the right side of the FONT LIST box, click on the
down arrow and set the FONT SIZE to 48PT.
Select the Text by triple clicking over it and set
the OUTLINE/STROKE COLOR to WHITE.
Step 26: Set Gradient with Fountain Fill
Go over to the TOOLBOX and select the FILL TOOL ICON.
Scroll over to the pop up Menu and select FOUNTAIN FILL.
Corel Draw X6 Font List
Corel Draw X6 New Product Flyer Title Text
Corel Draw X6 Title Text with White Stroke
Corel Draw X6 Fill Tool Icon Fountain Fill
Page 25 of 31
Corel Draw X6 Tutorial – New Product Flyer www.flyertutor.com
This opens the FOUNTAIN FILL
WINDOW.
In the COLOR BLEND SECTION, TWO
COLOR should be checked.
To the right side of the FROM option, select the down arrow and
choose MORE at the bottom of the COLOR PALETTE.
This opens the SELECT COLOR WINDOW.
Corel Draw X6 Fountain Fill Window
Corel Draw X6 From Color Palette
Corel Draw X6 Select Color Window
Page 26 of 31
Corel Draw X6 Tutorial – New Product Flyer www.flyertutor.com
To the right side of the PALETTE OPTION, click on the down
arrow next to RGB PALETTE to reveal a popup menu.
Select DOCUMENT PALETTE.
Select the RED color that has been
used on the flyer and click OK.
Repeat this process in
the FOUNTAIN FILL WINDOW to set
the color for the TO option to our
already used GREEN.
Corel Draw X6 Document Palette Option
Corel Draw X6 Select Color Window Document Palette
Page 27 of 31
Corel Draw X6 Tutorial – New Product Flyer www.flyertutor.com
In the FOUNTAIN FILL WINDOW, under the
FROM and TO options, you will see MIDPOINT.
Set it to 25 by either typing the number in
the box or move the slider to that position.
Then click OK.
The TITLE TEXT will now have a GRADIENT FILL.
Step 27: Set Outline Width
Now we can change the size of the OUTLINE, so that the Text
stands out.
Select the TEXT again and on the MENU BAR, select TEXT > TEXT
PROPERTIES.
Corel Draw X6 Fountain Fill Gradient SettingsCorel Draw X6 New Product Flyer
Gradient Filled Title Text
Corel Draw X6 Text Properties
Page 28 of 31
Corel Draw X6 Tutorial – New Product Flyer www.flyertutor.com
This opens a TEXT PROPERTIES DOCKER on the right side of
the Window.
You will see settings for CHARACTER and PARAGRAPH.
Set the OUTLINE WIDTH, represented by this
ICON to 2.5PT.
Then click on any white area on the canvas to see the change applied to
the Text.
Corel Draw X6 Text Properties Docker
Corel Draw
X6 Outline
Width Icon
Corel Draw X6 Gradient
Filled Text With Outline
Page 29 of 31
Corel Draw X6 Tutorial – New Product Flyer www.flyertutor.com
Step 28: Add Remaining Text
Next type the ADDRESS and HUGGABLE LOVE TEXT, setting
the FONT to NOTMARYKATE. The FONT SIZE should be set
to 18PT and 24PT respectively.
Change the alignment of the Text by selecting the HORIZONTAL ALIGNMENT
ICON and choosing RIGHT from the Menu.
You also could go over to the PARAGRAPH section of the TEXT
PROPERTIES DOCKER and select the ALIGN RIGHT ICON.
Choose the method that is easiest for
you.
Set the 'PERSONALIZE' text to GABRIELLE, SIZE 40PT, and
the 'HUGGABLE LOVE' text at the bottom of the flyer to
NOTMARYKATE, SIZE 24PT.
Repeat the step to change the color of the HUGGABLE LOVE text
at the top and bottom to our RED from the DOCUMENT PALETTE.
Step 29: Adjust Leading/Line Spacing
You'll notice that the text at the bottom seems to overlap the RED LAYER.
To fix this, simply click anywhere in the paragraph and adjust the LINE SPACING in
the PARAGRAPH section of the TEXT PROPERTIES DOCKER.
If you have trouble finding it, just look out for this ICON.
Corel Draw X6 Horizontal
Alignment Icon
Corel Draw X6 Text Properties
Paragraph Align Right
Corel Draw X6
Right Aligned Text
Corel Draw X6
Line Spacing Icon
Page 30 of 31
Corel Draw X6 Tutorial – New Product Flyer www.flyertutor.com
Set the LINE SPACING to 80%. So the almost complete flyer should
look something like this:
The remaining text uses the GABRIELLE FONT, at SIZE 36PT, ALIGN
CENTER and has LINE SPACING set to 80%.
Step 30: Save File
Now all that's left to do is SAVE your file. Go to the MENU BAR and
select FILE > SAVE.
This opens the SAVE DRAWING WINDOW.
Corel Draw X6 New Product Flyer With Text
Corel Draw X6 File Menu Save
Corel Draw X6 Save Drawing Window
Page 31 of 31
Corel Draw X6 Tutorial – New Product Flyer www.flyertutor.com
Browse to where you wish to
save, create your file name, and
click SAVE.
If you are new to COREL DRAW, I
hope this tutorial shed some light
on some of the many functions of
the COREL DRAW INTERFACE.
FlyerTutor hosts Free Flyer
Tutorials in various Graphic
Design Programs - Microsoft
Publisher, Microsoft Word, Adobe
Illustrator, OpenOffice
Draw, Inkscape, Corel Draw, along
with over 50 Free Flyer Templates.
Thank you for visiting!
Corel Draw X6 New Product Flyer

Weitere ähnliche Inhalte

Was ist angesagt?

Adobe Illustrator: 6 Essential Tips and Tools
Adobe Illustrator: 6 Essential Tips and ToolsAdobe Illustrator: 6 Essential Tips and Tools
Adobe Illustrator: 6 Essential Tips and ToolsNguyet Minh
 
Adobe Illustrator Basics
Adobe Illustrator BasicsAdobe Illustrator Basics
Adobe Illustrator BasicsChris Maxwell
 
Adobe Illustrator for beginners
Adobe Illustrator for beginners Adobe Illustrator for beginners
Adobe Illustrator for beginners suniltalekar1
 
Adobe illustrator getting started
Adobe illustrator getting startedAdobe illustrator getting started
Adobe illustrator getting startedDanielle Oser, APR
 
Adobe illustrator cs4 tutorial
Adobe illustrator cs4 tutorial Adobe illustrator cs4 tutorial
Adobe illustrator cs4 tutorial Agung Yuwono
 
DID Unit 5 - Illustrator Basics
DID Unit 5 - Illustrator BasicsDID Unit 5 - Illustrator Basics
DID Unit 5 - Illustrator BasicsMrLawler
 
Learn corel draw easily at home
Learn corel draw easily at homeLearn corel draw easily at home
Learn corel draw easily at homedeepakvermaynr
 
Adobe Illustrator - Creating the Poster
Adobe Illustrator - Creating the PosterAdobe Illustrator - Creating the Poster
Adobe Illustrator - Creating the PosterTimothy F McKenna
 
Mapping with Adobe CC
Mapping with Adobe CCMapping with Adobe CC
Mapping with Adobe CCDUSPviz
 
Intro to Adobe Illustrator Vector Concepts
Intro to Adobe Illustrator Vector ConceptsIntro to Adobe Illustrator Vector Concepts
Intro to Adobe Illustrator Vector ConceptsKaitlin Hanger, Ph.D.
 
Adobe illustrator 2
Adobe illustrator 2Adobe illustrator 2
Adobe illustrator 2ilaazmil2
 
Photoshop notes cs-4
Photoshop notes  cs-4Photoshop notes  cs-4
Photoshop notes cs-4SirajRock
 
Intro to inkscape
Intro to inkscapeIntro to inkscape
Intro to inkscapeDUSPviz
 
Introduction to CorelDRAW
Introduction to CorelDRAWIntroduction to CorelDRAW
Introduction to CorelDRAWSanthiNivas
 
Illustrator's basic shapes part 2 & combining shapes
Illustrator's basic shapes part 2 & combining shapesIllustrator's basic shapes part 2 & combining shapes
Illustrator's basic shapes part 2 & combining shapesJerry Arnold
 
Illustrator's basic shapes part 1
Illustrator's basic shapes part 1Illustrator's basic shapes part 1
Illustrator's basic shapes part 1Jerry Arnold
 

Was ist angesagt? (20)

Adobe Illustrator: 6 Essential Tips and Tools
Adobe Illustrator: 6 Essential Tips and ToolsAdobe Illustrator: 6 Essential Tips and Tools
Adobe Illustrator: 6 Essential Tips and Tools
 
Adobe Illustrator Basics
Adobe Illustrator BasicsAdobe Illustrator Basics
Adobe Illustrator Basics
 
Introduction to Corel Draw
Introduction to Corel DrawIntroduction to Corel Draw
Introduction to Corel Draw
 
Adobe Illustrator for beginners
Adobe Illustrator for beginners Adobe Illustrator for beginners
Adobe Illustrator for beginners
 
Adobe illustrator getting started
Adobe illustrator getting startedAdobe illustrator getting started
Adobe illustrator getting started
 
Adobe illustrator cs4 tutorial
Adobe illustrator cs4 tutorial Adobe illustrator cs4 tutorial
Adobe illustrator cs4 tutorial
 
Corel draw tools
Corel draw toolsCorel draw tools
Corel draw tools
 
DID Unit 5 - Illustrator Basics
DID Unit 5 - Illustrator BasicsDID Unit 5 - Illustrator Basics
DID Unit 5 - Illustrator Basics
 
Digitizing a logo
Digitizing a logoDigitizing a logo
Digitizing a logo
 
Learn corel draw easily at home
Learn corel draw easily at homeLearn corel draw easily at home
Learn corel draw easily at home
 
Adobe Illustrator - Creating the Poster
Adobe Illustrator - Creating the PosterAdobe Illustrator - Creating the Poster
Adobe Illustrator - Creating the Poster
 
Mapping with Adobe CC
Mapping with Adobe CCMapping with Adobe CC
Mapping with Adobe CC
 
Intro to Adobe Illustrator Vector Concepts
Intro to Adobe Illustrator Vector ConceptsIntro to Adobe Illustrator Vector Concepts
Intro to Adobe Illustrator Vector Concepts
 
Adobe illustrator 2
Adobe illustrator 2Adobe illustrator 2
Adobe illustrator 2
 
Photoshop notes cs-4
Photoshop notes  cs-4Photoshop notes  cs-4
Photoshop notes cs-4
 
Intro to inkscape
Intro to inkscapeIntro to inkscape
Intro to inkscape
 
Introduction to CorelDRAW
Introduction to CorelDRAWIntroduction to CorelDRAW
Introduction to CorelDRAW
 
Illustrator's basic shapes part 2 & combining shapes
Illustrator's basic shapes part 2 & combining shapesIllustrator's basic shapes part 2 & combining shapes
Illustrator's basic shapes part 2 & combining shapes
 
Illustrator's basic shapes part 1
Illustrator's basic shapes part 1Illustrator's basic shapes part 1
Illustrator's basic shapes part 1
 
Corel draw
Corel drawCorel draw
Corel draw
 

Andere mochten auch

Microsoft Word 2007 Tutorial: Digital Photography Flyer
Microsoft Word 2007 Tutorial: Digital Photography FlyerMicrosoft Word 2007 Tutorial: Digital Photography Flyer
Microsoft Word 2007 Tutorial: Digital Photography FlyerFlyer Tutor
 
Adobe Illustrator Tutorials: Easter Egg Hunt Flyer
Adobe Illustrator Tutorials: Easter Egg Hunt FlyerAdobe Illustrator Tutorials: Easter Egg Hunt Flyer
Adobe Illustrator Tutorials: Easter Egg Hunt FlyerFlyer Tutor
 
OpenOffice Draw Tutorial: Digital Photography Flyer
OpenOffice Draw Tutorial: Digital Photography FlyerOpenOffice Draw Tutorial: Digital Photography Flyer
OpenOffice Draw Tutorial: Digital Photography FlyerFlyer Tutor
 
Inkscape Beginner Tutorial: How to Make a Yoga Class Flyer
Inkscape Beginner Tutorial: How to Make a Yoga Class FlyerInkscape Beginner Tutorial: How to Make a Yoga Class Flyer
Inkscape Beginner Tutorial: How to Make a Yoga Class FlyerFlyer Tutor
 
Microsoft Word Tutorial: Bridal Pageant Boutique Flyer
Microsoft Word Tutorial: Bridal Pageant Boutique FlyerMicrosoft Word Tutorial: Bridal Pageant Boutique Flyer
Microsoft Word Tutorial: Bridal Pageant Boutique FlyerFlyer Tutor
 
Inkscape Tutorials: Easter Egg Hunt Flyer
Inkscape Tutorials: Easter Egg Hunt FlyerInkscape Tutorials: Easter Egg Hunt Flyer
Inkscape Tutorials: Easter Egg Hunt FlyerFlyer Tutor
 
Inkscape Tutorials: Digital Photography Flyer
Inkscape Tutorials: Digital Photography FlyerInkscape Tutorials: Digital Photography Flyer
Inkscape Tutorials: Digital Photography FlyerFlyer Tutor
 
Microsoft Publisher 2007 Tutorial: Digital Photography Flyer
Microsoft Publisher 2007 Tutorial: Digital Photography FlyerMicrosoft Publisher 2007 Tutorial: Digital Photography Flyer
Microsoft Publisher 2007 Tutorial: Digital Photography FlyerFlyer Tutor
 

Andere mochten auch (8)

Microsoft Word 2007 Tutorial: Digital Photography Flyer
Microsoft Word 2007 Tutorial: Digital Photography FlyerMicrosoft Word 2007 Tutorial: Digital Photography Flyer
Microsoft Word 2007 Tutorial: Digital Photography Flyer
 
Adobe Illustrator Tutorials: Easter Egg Hunt Flyer
Adobe Illustrator Tutorials: Easter Egg Hunt FlyerAdobe Illustrator Tutorials: Easter Egg Hunt Flyer
Adobe Illustrator Tutorials: Easter Egg Hunt Flyer
 
OpenOffice Draw Tutorial: Digital Photography Flyer
OpenOffice Draw Tutorial: Digital Photography FlyerOpenOffice Draw Tutorial: Digital Photography Flyer
OpenOffice Draw Tutorial: Digital Photography Flyer
 
Inkscape Beginner Tutorial: How to Make a Yoga Class Flyer
Inkscape Beginner Tutorial: How to Make a Yoga Class FlyerInkscape Beginner Tutorial: How to Make a Yoga Class Flyer
Inkscape Beginner Tutorial: How to Make a Yoga Class Flyer
 
Microsoft Word Tutorial: Bridal Pageant Boutique Flyer
Microsoft Word Tutorial: Bridal Pageant Boutique FlyerMicrosoft Word Tutorial: Bridal Pageant Boutique Flyer
Microsoft Word Tutorial: Bridal Pageant Boutique Flyer
 
Inkscape Tutorials: Easter Egg Hunt Flyer
Inkscape Tutorials: Easter Egg Hunt FlyerInkscape Tutorials: Easter Egg Hunt Flyer
Inkscape Tutorials: Easter Egg Hunt Flyer
 
Inkscape Tutorials: Digital Photography Flyer
Inkscape Tutorials: Digital Photography FlyerInkscape Tutorials: Digital Photography Flyer
Inkscape Tutorials: Digital Photography Flyer
 
Microsoft Publisher 2007 Tutorial: Digital Photography Flyer
Microsoft Publisher 2007 Tutorial: Digital Photography FlyerMicrosoft Publisher 2007 Tutorial: Digital Photography Flyer
Microsoft Publisher 2007 Tutorial: Digital Photography Flyer
 

Ähnlich wie Corel Draw X6 Flyer Tutorial

MEMBUAT LOGO THE COFFEE SHOP
MEMBUAT LOGO THE COFFEE SHOPMEMBUAT LOGO THE COFFEE SHOP
MEMBUAT LOGO THE COFFEE SHOPDIANTO IRAWAN
 
advanced%20corel%20draw
advanced%20corel%20drawadvanced%20corel%20draw
advanced%20corel%20drawtutorialsruby
 
advanced%20corel%20draw
advanced%20corel%20drawadvanced%20corel%20draw
advanced%20corel%20drawtutorialsruby
 
A Data Processing Presentation on Graphics
A Data Processing Presentation on GraphicsA Data Processing Presentation on Graphics
A Data Processing Presentation on GraphicsEjiro Ndifereke
 
CorelDraw%20Tutorial%203
CorelDraw%20Tutorial%203CorelDraw%20Tutorial%203
CorelDraw%20Tutorial%203tutorialsruby
 
CorelDraw%20Tutorial%203
CorelDraw%20Tutorial%203CorelDraw%20Tutorial%203
CorelDraw%20Tutorial%203tutorialsruby
 
Inkscape Fall Fest Flyer Tutorial
Inkscape Fall Fest Flyer TutorialInkscape Fall Fest Flyer Tutorial
Inkscape Fall Fest Flyer TutorialFlyer Tutor
 
Create The Featured Project Section:
Create The Featured Project Section:Create The Featured Project Section:
Create The Featured Project Section:Reema
 
Plan601 e session 4 demo
Plan601 e session 4 demoPlan601 e session 4 demo
Plan601 e session 4 demorkottam
 
Introduction to CAD
Introduction to CADIntroduction to CAD
Introduction to CADsyar2604
 
Plan601 e session 2 demob
Plan601 e session 2 demobPlan601 e session 2 demob
Plan601 e session 2 demobrkottam
 
Pepsi vector tutorial
Pepsi vector tutorialPepsi vector tutorial
Pepsi vector tutorialbalermm
 
Unit 5 Task 4 Tutorial
Unit 5 Task 4 TutorialUnit 5 Task 4 Tutorial
Unit 5 Task 4 Tutorialilyaboj
 
Unit 5 Task 4 Create an Ad
Unit 5 Task 4 Create an AdUnit 5 Task 4 Create an Ad
Unit 5 Task 4 Create an Adilyaboj
 
Plan601 e session 4 demo
Plan601 e session 4 demoPlan601 e session 4 demo
Plan601 e session 4 demorkottam
 
Adobe Illustrator CS5 Part 2 : Vector Graphic Effects
Adobe Illustrator CS5 Part 2 : Vector Graphic EffectsAdobe Illustrator CS5 Part 2 : Vector Graphic Effects
Adobe Illustrator CS5 Part 2 : Vector Graphic Effectscsula its training
 

Ähnlich wie Corel Draw X6 Flyer Tutorial (20)

MEMBUAT LOGO THE COFFEE SHOP
MEMBUAT LOGO THE COFFEE SHOPMEMBUAT LOGO THE COFFEE SHOP
MEMBUAT LOGO THE COFFEE SHOP
 
Dr 2
Dr 2Dr 2
Dr 2
 
advanced%20corel%20draw
advanced%20corel%20drawadvanced%20corel%20draw
advanced%20corel%20draw
 
advanced%20corel%20draw
advanced%20corel%20drawadvanced%20corel%20draw
advanced%20corel%20draw
 
Logo tutor
Logo tutorLogo tutor
Logo tutor
 
Corel draw
Corel drawCorel draw
Corel draw
 
A Data Processing Presentation on Graphics
A Data Processing Presentation on GraphicsA Data Processing Presentation on Graphics
A Data Processing Presentation on Graphics
 
CorelDraw%20Tutorial%203
CorelDraw%20Tutorial%203CorelDraw%20Tutorial%203
CorelDraw%20Tutorial%203
 
CorelDraw%20Tutorial%203
CorelDraw%20Tutorial%203CorelDraw%20Tutorial%203
CorelDraw%20Tutorial%203
 
Inkscape Fall Fest Flyer Tutorial
Inkscape Fall Fest Flyer TutorialInkscape Fall Fest Flyer Tutorial
Inkscape Fall Fest Flyer Tutorial
 
Create The Featured Project Section:
Create The Featured Project Section:Create The Featured Project Section:
Create The Featured Project Section:
 
Plan601 e session 4 demo
Plan601 e session 4 demoPlan601 e session 4 demo
Plan601 e session 4 demo
 
Introduction to CAD
Introduction to CADIntroduction to CAD
Introduction to CAD
 
Plan601 e session 2 demob
Plan601 e session 2 demobPlan601 e session 2 demob
Plan601 e session 2 demob
 
Pepsi vector tutorial
Pepsi vector tutorialPepsi vector tutorial
Pepsi vector tutorial
 
Unit 5 Task 4 Tutorial
Unit 5 Task 4 TutorialUnit 5 Task 4 Tutorial
Unit 5 Task 4 Tutorial
 
Unit 5 Task 4 Create an Ad
Unit 5 Task 4 Create an AdUnit 5 Task 4 Create an Ad
Unit 5 Task 4 Create an Ad
 
Plan601 e session 4 demo
Plan601 e session 4 demoPlan601 e session 4 demo
Plan601 e session 4 demo
 
Adobe Illustrator CS5 Part 2 : Vector Graphic Effects
Adobe Illustrator CS5 Part 2 : Vector Graphic EffectsAdobe Illustrator CS5 Part 2 : Vector Graphic Effects
Adobe Illustrator CS5 Part 2 : Vector Graphic Effects
 
Tutorial Coreldraw_2
Tutorial Coreldraw_2Tutorial Coreldraw_2
Tutorial Coreldraw_2
 

Mehr von Flyer Tutor

Inkscape Computer Classes Flyer Tutorial
Inkscape Computer Classes Flyer TutorialInkscape Computer Classes Flyer Tutorial
Inkscape Computer Classes Flyer TutorialFlyer Tutor
 
Microsoft Word Tutorial: Easter Egg Hunt Flyer
Microsoft Word Tutorial: Easter Egg Hunt FlyerMicrosoft Word Tutorial: Easter Egg Hunt Flyer
Microsoft Word Tutorial: Easter Egg Hunt FlyerFlyer Tutor
 
OpenOffice Draw Tutorials: Easter Egg Hunt Flyer
OpenOffice Draw Tutorials: Easter Egg Hunt FlyerOpenOffice Draw Tutorials: Easter Egg Hunt Flyer
OpenOffice Draw Tutorials: Easter Egg Hunt FlyerFlyer Tutor
 
Corel Draw Tutorials: Easter Egg Hunt Flyer
Corel Draw Tutorials: Easter Egg Hunt FlyerCorel Draw Tutorials: Easter Egg Hunt Flyer
Corel Draw Tutorials: Easter Egg Hunt FlyerFlyer Tutor
 
OpenOffice Draw Tutorials: Florist Flyer
OpenOffice Draw Tutorials: Florist FlyerOpenOffice Draw Tutorials: Florist Flyer
OpenOffice Draw Tutorials: Florist FlyerFlyer Tutor
 
Microsoft Publisher 2007 Tutorial: Easter Egg Hunt Flyer
Microsoft Publisher 2007 Tutorial: Easter Egg Hunt FlyerMicrosoft Publisher 2007 Tutorial: Easter Egg Hunt Flyer
Microsoft Publisher 2007 Tutorial: Easter Egg Hunt FlyerFlyer Tutor
 
Adobe Illustrator Tutorials: Digital Photography Flyer
Adobe Illustrator Tutorials: Digital Photography FlyerAdobe Illustrator Tutorials: Digital Photography Flyer
Adobe Illustrator Tutorials: Digital Photography FlyerFlyer Tutor
 
Microsoft Word 2007 Tutorials: Florist Flyer
Microsoft Word 2007 Tutorials: Florist FlyerMicrosoft Word 2007 Tutorials: Florist Flyer
Microsoft Word 2007 Tutorials: Florist FlyerFlyer Tutor
 
Microsoft Publisher 2007 Tutorials: Florist Flyer
Microsoft Publisher 2007 Tutorials: Florist FlyerMicrosoft Publisher 2007 Tutorials: Florist Flyer
Microsoft Publisher 2007 Tutorials: Florist FlyerFlyer Tutor
 
Illustrator Tutorials: Florist Flyer
Illustrator Tutorials: Florist FlyerIllustrator Tutorials: Florist Flyer
Illustrator Tutorials: Florist FlyerFlyer Tutor
 
Inkscape Tutorials: Florist Flyer
Inkscape Tutorials: Florist FlyerInkscape Tutorials: Florist Flyer
Inkscape Tutorials: Florist FlyerFlyer Tutor
 
Inkscape Tutorials: Bridal Pageant Boutique Flyer
Inkscape Tutorials: Bridal Pageant Boutique FlyerInkscape Tutorials: Bridal Pageant Boutique Flyer
Inkscape Tutorials: Bridal Pageant Boutique FlyerFlyer Tutor
 

Mehr von Flyer Tutor (12)

Inkscape Computer Classes Flyer Tutorial
Inkscape Computer Classes Flyer TutorialInkscape Computer Classes Flyer Tutorial
Inkscape Computer Classes Flyer Tutorial
 
Microsoft Word Tutorial: Easter Egg Hunt Flyer
Microsoft Word Tutorial: Easter Egg Hunt FlyerMicrosoft Word Tutorial: Easter Egg Hunt Flyer
Microsoft Word Tutorial: Easter Egg Hunt Flyer
 
OpenOffice Draw Tutorials: Easter Egg Hunt Flyer
OpenOffice Draw Tutorials: Easter Egg Hunt FlyerOpenOffice Draw Tutorials: Easter Egg Hunt Flyer
OpenOffice Draw Tutorials: Easter Egg Hunt Flyer
 
Corel Draw Tutorials: Easter Egg Hunt Flyer
Corel Draw Tutorials: Easter Egg Hunt FlyerCorel Draw Tutorials: Easter Egg Hunt Flyer
Corel Draw Tutorials: Easter Egg Hunt Flyer
 
OpenOffice Draw Tutorials: Florist Flyer
OpenOffice Draw Tutorials: Florist FlyerOpenOffice Draw Tutorials: Florist Flyer
OpenOffice Draw Tutorials: Florist Flyer
 
Microsoft Publisher 2007 Tutorial: Easter Egg Hunt Flyer
Microsoft Publisher 2007 Tutorial: Easter Egg Hunt FlyerMicrosoft Publisher 2007 Tutorial: Easter Egg Hunt Flyer
Microsoft Publisher 2007 Tutorial: Easter Egg Hunt Flyer
 
Adobe Illustrator Tutorials: Digital Photography Flyer
Adobe Illustrator Tutorials: Digital Photography FlyerAdobe Illustrator Tutorials: Digital Photography Flyer
Adobe Illustrator Tutorials: Digital Photography Flyer
 
Microsoft Word 2007 Tutorials: Florist Flyer
Microsoft Word 2007 Tutorials: Florist FlyerMicrosoft Word 2007 Tutorials: Florist Flyer
Microsoft Word 2007 Tutorials: Florist Flyer
 
Microsoft Publisher 2007 Tutorials: Florist Flyer
Microsoft Publisher 2007 Tutorials: Florist FlyerMicrosoft Publisher 2007 Tutorials: Florist Flyer
Microsoft Publisher 2007 Tutorials: Florist Flyer
 
Illustrator Tutorials: Florist Flyer
Illustrator Tutorials: Florist FlyerIllustrator Tutorials: Florist Flyer
Illustrator Tutorials: Florist Flyer
 
Inkscape Tutorials: Florist Flyer
Inkscape Tutorials: Florist FlyerInkscape Tutorials: Florist Flyer
Inkscape Tutorials: Florist Flyer
 
Inkscape Tutorials: Bridal Pageant Boutique Flyer
Inkscape Tutorials: Bridal Pageant Boutique FlyerInkscape Tutorials: Bridal Pageant Boutique Flyer
Inkscape Tutorials: Bridal Pageant Boutique Flyer
 

Kürzlich hochgeladen

10 Best WordPress Plugins to make the website effective in 2024
10 Best WordPress Plugins to make the website effective in 202410 Best WordPress Plugins to make the website effective in 2024
10 Best WordPress Plugins to make the website effective in 2024digital learning point
 
guest bathroom white and bluesssssssssss
guest bathroom white and bluesssssssssssguest bathroom white and bluesssssssssss
guest bathroom white and bluesssssssssssNadaMohammed714321
 
General Simple Guide About AI in Design By: A.L. Samar Hossam ElDin
General Simple Guide About AI in Design By: A.L. Samar Hossam ElDinGeneral Simple Guide About AI in Design By: A.L. Samar Hossam ElDin
General Simple Guide About AI in Design By: A.L. Samar Hossam ElDinSamar Hossam ElDin Ahmed
 
simpson-lee_house_dt20ajshsjsjsjsjj15.pdf
simpson-lee_house_dt20ajshsjsjsjsjj15.pdfsimpson-lee_house_dt20ajshsjsjsjsjj15.pdf
simpson-lee_house_dt20ajshsjsjsjsjj15.pdfLucyBonelli
 
Karim apartment ideas 02 ppppppppppppppp
Karim apartment ideas 02 pppppppppppppppKarim apartment ideas 02 ppppppppppppppp
Karim apartment ideas 02 pppppppppppppppNadaMohammed714321
 
The spirit of digital place - game worlds and architectural phenomenology
The spirit of digital place - game worlds and architectural phenomenologyThe spirit of digital place - game worlds and architectural phenomenology
The spirit of digital place - game worlds and architectural phenomenologyChristopher Totten
 
AI and Design Vol. 2: Navigating the New Frontier - Morgenbooster
AI and Design Vol. 2: Navigating the New Frontier - MorgenboosterAI and Design Vol. 2: Navigating the New Frontier - Morgenbooster
AI and Design Vol. 2: Navigating the New Frontier - Morgenbooster1508 A/S
 
guest bathroom white and blue ssssssssss
guest bathroom white and blue ssssssssssguest bathroom white and blue ssssssssss
guest bathroom white and blue ssssssssssNadaMohammed714321
 
Sharif's 9-BOX Monitoring Model for Adaptive Programme Management
Sharif's 9-BOX Monitoring Model for Adaptive Programme ManagementSharif's 9-BOX Monitoring Model for Adaptive Programme Management
Sharif's 9-BOX Monitoring Model for Adaptive Programme ManagementMd. Shariful Hoque
 
Piece by Piece Magazine
Piece by Piece Magazine                      Piece by Piece Magazine
Piece by Piece Magazine CharlottePulte
 
NBA power point presentation final copy y
NBA power point presentation final copy yNBA power point presentation final copy y
NBA power point presentation final copy ysrajece
 
Making and Unmaking of Chandigarh - A City of Two Plans2-4-24.ppt
Making and Unmaking of Chandigarh - A City of Two Plans2-4-24.pptMaking and Unmaking of Chandigarh - A City of Two Plans2-4-24.ppt
Making and Unmaking of Chandigarh - A City of Two Plans2-4-24.pptJIT KUMAR GUPTA
 
Niintendo Wii Presentation Template.pptx
Niintendo Wii Presentation Template.pptxNiintendo Wii Presentation Template.pptx
Niintendo Wii Presentation Template.pptxKevinYaelJimnezSanti
 
Map of St. Louis Parks
Map of St. Louis Parks                              Map of St. Louis Parks
Map of St. Louis Parks CharlottePulte
 
Unit1_Syllbwbnwnwneneneneneneentation_Sem2.pptx
Unit1_Syllbwbnwnwneneneneneneentation_Sem2.pptxUnit1_Syllbwbnwnwneneneneneneentation_Sem2.pptx
Unit1_Syllbwbnwnwneneneneneneentation_Sem2.pptxNitish292041
 
10 must-have Chrome extensions for designers
10 must-have Chrome extensions for designers10 must-have Chrome extensions for designers
10 must-have Chrome extensions for designersPixeldarts
 
world health day 2024.pptxgbbvggvbhjjjbbbb
world health day 2024.pptxgbbvggvbhjjjbbbbworld health day 2024.pptxgbbvggvbhjjjbbbb
world health day 2024.pptxgbbvggvbhjjjbbbbpreetirao780
 
Karim apartment ideas 01 ppppppppppppppp
Karim apartment ideas 01 pppppppppppppppKarim apartment ideas 01 ppppppppppppppp
Karim apartment ideas 01 pppppppppppppppNadaMohammed714321
 
FW25-26 Knit Cut & Sew Trend Book Peclers Paris
FW25-26 Knit Cut & Sew Trend Book Peclers ParisFW25-26 Knit Cut & Sew Trend Book Peclers Paris
FW25-26 Knit Cut & Sew Trend Book Peclers ParisPeclers Paris
 
怎么办理英国Newcastle毕业证纽卡斯尔大学学位证书一手渠道
怎么办理英国Newcastle毕业证纽卡斯尔大学学位证书一手渠道怎么办理英国Newcastle毕业证纽卡斯尔大学学位证书一手渠道
怎么办理英国Newcastle毕业证纽卡斯尔大学学位证书一手渠道yrolcks
 

Kürzlich hochgeladen (20)

10 Best WordPress Plugins to make the website effective in 2024
10 Best WordPress Plugins to make the website effective in 202410 Best WordPress Plugins to make the website effective in 2024
10 Best WordPress Plugins to make the website effective in 2024
 
guest bathroom white and bluesssssssssss
guest bathroom white and bluesssssssssssguest bathroom white and bluesssssssssss
guest bathroom white and bluesssssssssss
 
General Simple Guide About AI in Design By: A.L. Samar Hossam ElDin
General Simple Guide About AI in Design By: A.L. Samar Hossam ElDinGeneral Simple Guide About AI in Design By: A.L. Samar Hossam ElDin
General Simple Guide About AI in Design By: A.L. Samar Hossam ElDin
 
simpson-lee_house_dt20ajshsjsjsjsjj15.pdf
simpson-lee_house_dt20ajshsjsjsjsjj15.pdfsimpson-lee_house_dt20ajshsjsjsjsjj15.pdf
simpson-lee_house_dt20ajshsjsjsjsjj15.pdf
 
Karim apartment ideas 02 ppppppppppppppp
Karim apartment ideas 02 pppppppppppppppKarim apartment ideas 02 ppppppppppppppp
Karim apartment ideas 02 ppppppppppppppp
 
The spirit of digital place - game worlds and architectural phenomenology
The spirit of digital place - game worlds and architectural phenomenologyThe spirit of digital place - game worlds and architectural phenomenology
The spirit of digital place - game worlds and architectural phenomenology
 
AI and Design Vol. 2: Navigating the New Frontier - Morgenbooster
AI and Design Vol. 2: Navigating the New Frontier - MorgenboosterAI and Design Vol. 2: Navigating the New Frontier - Morgenbooster
AI and Design Vol. 2: Navigating the New Frontier - Morgenbooster
 
guest bathroom white and blue ssssssssss
guest bathroom white and blue ssssssssssguest bathroom white and blue ssssssssss
guest bathroom white and blue ssssssssss
 
Sharif's 9-BOX Monitoring Model for Adaptive Programme Management
Sharif's 9-BOX Monitoring Model for Adaptive Programme ManagementSharif's 9-BOX Monitoring Model for Adaptive Programme Management
Sharif's 9-BOX Monitoring Model for Adaptive Programme Management
 
Piece by Piece Magazine
Piece by Piece Magazine                      Piece by Piece Magazine
Piece by Piece Magazine
 
NBA power point presentation final copy y
NBA power point presentation final copy yNBA power point presentation final copy y
NBA power point presentation final copy y
 
Making and Unmaking of Chandigarh - A City of Two Plans2-4-24.ppt
Making and Unmaking of Chandigarh - A City of Two Plans2-4-24.pptMaking and Unmaking of Chandigarh - A City of Two Plans2-4-24.ppt
Making and Unmaking of Chandigarh - A City of Two Plans2-4-24.ppt
 
Niintendo Wii Presentation Template.pptx
Niintendo Wii Presentation Template.pptxNiintendo Wii Presentation Template.pptx
Niintendo Wii Presentation Template.pptx
 
Map of St. Louis Parks
Map of St. Louis Parks                              Map of St. Louis Parks
Map of St. Louis Parks
 
Unit1_Syllbwbnwnwneneneneneneentation_Sem2.pptx
Unit1_Syllbwbnwnwneneneneneneentation_Sem2.pptxUnit1_Syllbwbnwnwneneneneneneentation_Sem2.pptx
Unit1_Syllbwbnwnwneneneneneneentation_Sem2.pptx
 
10 must-have Chrome extensions for designers
10 must-have Chrome extensions for designers10 must-have Chrome extensions for designers
10 must-have Chrome extensions for designers
 
world health day 2024.pptxgbbvggvbhjjjbbbb
world health day 2024.pptxgbbvggvbhjjjbbbbworld health day 2024.pptxgbbvggvbhjjjbbbb
world health day 2024.pptxgbbvggvbhjjjbbbb
 
Karim apartment ideas 01 ppppppppppppppp
Karim apartment ideas 01 pppppppppppppppKarim apartment ideas 01 ppppppppppppppp
Karim apartment ideas 01 ppppppppppppppp
 
FW25-26 Knit Cut & Sew Trend Book Peclers Paris
FW25-26 Knit Cut & Sew Trend Book Peclers ParisFW25-26 Knit Cut & Sew Trend Book Peclers Paris
FW25-26 Knit Cut & Sew Trend Book Peclers Paris
 
怎么办理英国Newcastle毕业证纽卡斯尔大学学位证书一手渠道
怎么办理英国Newcastle毕业证纽卡斯尔大学学位证书一手渠道怎么办理英国Newcastle毕业证纽卡斯尔大学学位证书一手渠道
怎么办理英国Newcastle毕业证纽卡斯尔大学学位证书一手渠道
 

Corel Draw X6 Flyer Tutorial

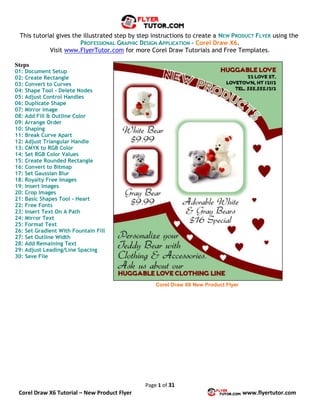
  • 1. Page 1 of 31 Corel Draw X6 Tutorial – New Product Flyer www.flyertutor.com This tutorial gives the illustrated step by step instructions to create a NEW PRODUCT FLYER using the PROFESSIONAL GRAPHIC DESIGN APPLICATION - Corel Draw X6. Visit www.FlyerTutor.com for more Corel Draw Tutorials and Free Templates. Steps 01: Document Setup 02: Create Rectangle 03: Convert to Curves 04: Shape Tool - Delete Nodes 05: Adjust Control Handles 06: Duplicate Shape 07: Mirror Image 08: Add Fill & Outline Color 09: Arrange Order 10: Shaping 11: Break Curve Apart 12: Adjust Triangular Handle 13: CMYK to RGB Color 14: Set RGB Color Values 15: Create Rounded Rectangle 16: Convert to Bitmap 17: Set Gaussian Blur 18: Royalty Free Images 19: Insert Images 20: Crop Images 21: Basic Shapes Tool - Heart 22: Free Fonts 23: Insert Text On A Path 24: Mirror Text 25: Format Text 26: Set Gradient With Fountain Fill 27: Set Outline Width 28: Add Remaining Text 29: Adjust Leading/Line Spacing 30: Save File Corel Draw X6 New Product Flyer
  • 2. Page 2 of 31 Corel Draw X6 Tutorial – New Product Flyer www.flyertutor.com Step 01: Document Setup To create a new document, go up to the MENU BAR and select FILE > NEW. This opens the CREATE A NEW DOCUMENT WINDOW. Corel Draw X6 Create New Document Window Make sure that SIZE is set to LETTER, and I've changed the PRIMARY COLOR MODE to RGB instead of CMYK. Click OK. Step 02: Create Rectangle Select the RECTANGLE TOOL from the TOOLBOX to the left of the screen. Corel Draw X6 File Menu New Corel Draw X6 Rectangle Tool
  • 3. Page 3 of 31 Corel Draw X6 Tutorial – New Product Flyer www.flyertutor.com Draw a RECTANGLE on the page. On the RECTANGLE TOOL CONTROL BAR, set the RECTANGLE HEIGHT to 6.1" and WIDTH to 7.1" by typing in the OBJECT SIZE BOXES. Step 03: Convert to Curves With the RECTANGLE still selected, right click over it to reveal a menu. Select CONVERT TO CURVES. Step 04: Shape Tool - Delete Nodes Select the SHAPE TOOL from the TOOLBOX. Corel Draw X6 Rectangle Corel Draw X6 Convert To Curves Corel Draw X6 Shape Tool
  • 4. Page 4 of 31 Corel Draw X6 Tutorial – New Product Flyer www.flyertutor.com The RECTANGLE will now have 4 TINY NODES at each corner. While holding down your mouse button, drag your cursor over the 2 RIGHT NODES, top and bottom. They will turn to BLUE SQUARES once selected. On the TOOL CONTROL BAR, select the DELETE NODES ICON. Once the Nodes are deleted, the shape changes. Corel Draw X6 Rectangle with 4 Nodes Corel Draw X6 Rectangle with 2 Selected Nodes Corel Draw X6 Delete Nodes Icon Corel Draw X6 Oval Shape
  • 5. Page 5 of 31 Corel Draw X6 Tutorial – New Product Flyer www.flyertutor.com Step 05: Adjust Control Handles To change the curve of the shape, select either of the remaining 2 Nodes. You will see 2 CONTROL HANDLES (SOLID BLUE ARROWHEADS). Decrease the distance between the CONTROL HANDLES by dragging each Handle closer to the other. Select the TOP LEFT NODE and drag to the TOP LEFT CORNER of the page. Select the PICK TOOL then click on the shape. Corel Draw X6 Shape with Adjusted Control Handles Corel Draw X6 Control Handle Corel Draw X6 Shape Control Handles Corel Draw X6 Pick Tool
  • 6. Page 6 of 31 Corel Draw X6 Tutorial – New Product Flyer www.flyertutor.com Step 06: Duplicate Shape Next we will create a DUPLICATE of this shape. Go to the MENU BAR and select EDIT > DUPLICATE, or you can hold down your CTRL and D keys together. An exact copy of your shape will appear. Step 07: Mirror Image On the TOOL CONTROL BAR select the MIRROR HORIZONTALLY ICON to flip the shape. Corel Draw X6 Edit Menu Duplicate Corel Draw X6 Duplicate Shape Corel Draw X6 Mirror Horizontally Icon
  • 7. Page 7 of 31 Corel Draw X6 Tutorial – New Product Flyer www.flyertutor.com Move the Duplicate Shape so that it lines up with the bottom of the page. Then alternate between the PICK TOOL and SHAPE TOOL to make adjustments to the size of the 2 shapes. The Duplicate Shape should be slightly smaller than the original. Step 8: Add Fill & Outline Color Now, to make the shapes a little easier to work with, let's add some Color to them. You can select both shapes by dragging the cursor over them while holding down the mouse button. On the right side of the screen will be the COLOR PALETTE. Select any color you choose. Simply click on your desired color in order to FILL the shape and right click over the same color to set the STROKE/OUTLINE of the shape. Corel Draw X6 Flipped Shape Corel Draw X6 Color Palette Segment Corel Draw X6 Fill and Stroke Color Applied
  • 8. Page 8 of 31 Corel Draw X6 Tutorial – New Product Flyer www.flyertutor.com Step 09: Arrange Order Using the RECTANGLE TOOL again, draw a RECTANGLE that completely covers the page, including the 2 shapes. Set its FILL COLOR to something different so that you are able to distinguish between the 2 layers. Now we will send this layer behind the first by changing the Order. On the MENU BAR select ARRANGE > ORDER > TO BACK OF PAGE. Step 10: Shaping Select both blue shapes. Do this by selecting 1 then hold down the SHIFT KEY and select the other. We will merge these 2 shapes together so that they become 1 shape. Corel Draw X6 Gray Rectangle Corel Draw X6 Ordered Layers Corel Draw X6 Arrange Order Back Of Page
  • 9. Page 9 of 31 Corel Draw X6 Tutorial – New Product Flyer www.flyertutor.com On the MENU BAR select ARRANGE > SHAPING > WELD. Drag the cursor over the entire page to again select both layers. Go back to the SHAPING MENU and this time select BACK MINUS FRONT. Your new shape should look something like this one. Select this new layer and repeat Step 06 to create a DUPLICATE. Corel Draw X6 Arrange Shaping Weld Corel Draw X6 Shaping Back Minus Front Corel Draw X6 Shaping Back Minus Front Cutout Corel Draw X6 Duplicated Layers
  • 10. Page 10 of 31 Corel Draw X6 Tutorial – New Product Flyer www.flyertutor.com Step 11: Break Curve Apart We will break this shape apart by going to the MENU BAR and selecting ARRANGE > BREAK CURVE APART. Now you'll be able to freely move each piece around. Remember to change the color so that it will be easier for you to spot which layer you are working with. Move the top shape directly above the back layer. Do the same for the bottom shape. Corel Draw X6 Arrange Break Curve Apart Corel Draw X6 Broken Curve Corel Draw X6 2 Shapes
  • 11. Page 11 of 31 Corel Draw X6 Tutorial – New Product Flyer www.flyertutor.com Select both shapes, and repeat Step 09 to Set Order, sending them to BACK OF LAYER. Then using the Arrow keys on your keyboard, move the shape downward until it is in the desired location on the flyer. Click any white area to deselect both shapes, then reselect the bottom shape and move upward to desired location. Step 12: Adjust Triangular Handle Notice there is still some white space separating the 2 layers at the corner. To remedy this, select the SHAPE TOOL, then click on the 2ND LAYER and drag the BLUE TRIANGULAR HANDLE upward to meet the top layer. Repeat this for the shape at the bottom of the page but select the BLUE SQUARE HANDLE instead and drag downward toward the 1st layer. Corel Draw X6 Order Back of Layer Corel Draw X6 Adjust Second Layer Corel Draw X6 New Product Flyer Background
  • 12. Page 12 of 31 Corel Draw X6 Tutorial – New Product Flyer www.flyertutor.com Step 13: CMYK to RGB Color Next we will set the color for each layer. To open the COLOR DOCKER go up to the MENU BAR and select WINDOW > DOCKERS > COLOR. Corel Draw X6 Color Window Docker
  • 13. Page 13 of 31 Corel Draw X6 Tutorial – New Product Flyer www.flyertutor.com The COLOR DOCKER will appear on the right side of the screen. Click on the down arrow to the right of CMYK and change to RGB. Step 14: Set RGB Color Values Change R to 128, G to 0 and B to 0. Then click on the NEW COLOR on the top left of the COLOR DOCKER to apply to shape. You can also select the FILL and OUTLINE buttons at the bottom of the Docker. Set the top layer to our GREEN COLOR - R to 153, G to 204 and B to 153. Then select FILL and OUTLINE. Corel Draw X6 Color Docker CMYK Corel Draw X6 Color Docker RGB Corel Draw X6 Layer with Color Corel Draw X6 Layers with Color
  • 14. Page 14 of 31 Corel Draw X6 Tutorial – New Product Flyer www.flyertutor.com Step 15: Create Rounded Rectangle Draw a Rectangle, setting its dimensions to WIDTH 1.6" and HEIGHT 1.75". To round the corners of this rectangle, select the ROUND CORNER ICON on the TOOLS CONTROLS BAR. Make sure that the EDIT CORNERS TOGETHER ICON is also selected, then set the CORNER RADIUS to 0.5". Now you can set the FILL and OUTLINE COLOR of the Rectangle by selecting the RED COLOR that was already used. If you look at the bottom of the screen you will see a COLOR PALETTE called the DOCUMENT PALETTE. It shows all the previously used colors within the document, this way you don’t have the trouble of re-entering all those color values again. Corel Draw X6 Round Corner Icon Corel Draw X6 Edit Corners Together Icon Corel Draw X6 Rounded Rectangle Corel Draw X6 Red Rounded Rectangle Corel Draw X6 Document Palette
  • 15. Page 15 of 31 Corel Draw X6 Tutorial – New Product Flyer www.flyertutor.com Step 16: Convert To Bitmap Now we're going to have to add a GAUSSIAN BLUR to this shape. With the Rectangle selected, go up to the MENU BAR and select BITMAPS > CONVERT TO BITMAP. A CONVERT TO BITMAP WINDOW appears. Click OK. Corel Draw X6 Bitmaps Convert to Bitmap Corel Draw X6 Convert to Bitmap Window
  • 16. Page 16 of 31 Corel Draw X6 Tutorial – New Product Flyer www.flyertutor.com Step 17: Set Gaussian Blur Go back to the BITMAP MENU and select BLUR > GAUSSIAN BLUR. This opens the GAUSSIAN BLUR WINDOW. Set the RADIUS to 20 then click OK. DUPLICATE this shape. Recreate a smaller WHITE RECTANGLE and place inside each of the RED RECTANGLES. Set WIDTH to 1.55" and HEIGHT to 1.7". Then set CORNER ROUNDNESS to 0.258". Create a DUPLICATE of this shape and place on top of the other RED RECTANGLE. Corel Draw X6 Bitmaps Gaussian Blur Corel Draw X6 Gaussian Blur Window Corel Draw X6 Rectangle with Gaussian Blur Corel Draw X6 White Rectangle with Red Background
  • 17. Page 17 of 31 Corel Draw X6 Tutorial – New Product Flyer www.flyertutor.com Draw another Rectangle with the following Dimensions: WIDTH 3.55" and HEIGHT 3.8". Set its CORNER ROUNDNESS to 0.6". Set its FILL and OUTLINE COLOR to our already used GREEN. Repeat the process to set the GAUSSIAN BLUR. Draw another WHITE RECTANGLE to place above the GREEN RECTANGLE setting WIDTH to 3.25" and HEIGHT to 3.5". Set CORNER ROUNDNESS to 0.55". Corel Draw X6 Rectangle Before Gaussian Blur Corel Draw X6 Rectangle After Gaussian Blur Corel Draw X6 New Product Flyer Colored Background
  • 18. Page 18 of 31 Corel Draw X6 Tutorial – New Product Flyer www.flyertutor.com Step 18: Royalty Free Images Now you are ready to add images. The images for this Corel Draw New Products Flyer were downloaded from Public Domain Pictures. This site hosts Royalty Free Public Doman Images. You are free to download and use images for both Commercial and Personal Use. Visit the FlyerTutor Blog posts on Royalty Free Stock Photography and Royalty Free Vector Clip Art to find out more. The top image is called WHITE TEDDY BEAR and can be found here. The bottom image is called TEDDY BEAR and can be found here. The image of the 2 bears is called TEDDY BEARS and can be found here. All 3 images were taken by Petr Kratochvil. Step 19: Insert Images Once you have downloaded the images, you will need to place them into the flyer. Starting with the WHITE TEDDY BEAR, go to the MENU BAR and select FILE > IMPORT. This opens the IMPORT WINDOW. Corel Draw X6 File Menu Import Corel Draw X6 Import Window
  • 19. Page 19 of 31 Corel Draw X6 Tutorial – New Product Flyer www.flyertutor.com Browse to where you saved the file. Select it and then click IMPORT on the bottom right of the window. You will see the IMAGE NAME along with some more details about the image next to your cursor. Click anywhere on the screen to place the image. Step 20: Crop Images With the image selected, click the SHAPE TOOL ICON on the TOOLBOX. The 8 BLACK SQUARE HANDLES around your image will change to 4 NODES. Select a NODE and drag INWARDS toward the image without cutting off any part of it and then release. Continue to move each NODE where necessary. Corel Draw X6 Image Name Corel Draw X6 White Bear with 8 Handles Corel Draw X6 White Bear with 4 Nodes Corel Draw X6 White Bear Move 1st Node Corel Draw X6 White Bear Move 2nd Node Corel Draw X6 White Bear Move 3rd Node Corel Draw X6 White Bear Move 4th Node
  • 20. Page 20 of 31 Corel Draw X6 Tutorial – New Product Flyer www.flyertutor.com Select the WHITE BEAR and change the SCALE FACTOR of the Image setting both the WIDTH and HEIGHT to 60%. You may be wondering what's the difference if the Background of the Image is White anyway? Let's just say it will be slightly easier to work with one over the other. Place the newly cropped image in the WHITE BOX. Repeat the steps to add the other 2 Images, crop them and place them where they need to be. Set the SCALE FACTOR for the GRAY BEAR to 65% and the image of the 2 BEARS to120%. Corel Draw X6 White Bear Scale Factor Corel Draw X6 Smaller White Bear Image With 4 Handles Corel Draw X6 White Bear Image With 4 Handles Corel Draw X6 Placed Image Corel Draw X6 New Product Flyer with Images
  • 21. Page 21 of 31 Corel Draw X6 Tutorial – New Product Flyer www.flyertutor.com Step 21: Basic Shapes Tool - Heart Next we will add some Hearts to the Flyer. On the TOOLBOX, select the BASIC SHAPES TOOL. On the TOOL CONTROLS BAR you'll see what looks like a PARALLELOGRAM. Click on the down arrow on the right and select the HEART ICON from the menu that appears. While holding down your CTRL key, draw a HEART on the screen, this gives you a proportional image. On the TOOL CONTROLS BAR set its WIDTH and HEIGHT to 0.6". Create a DUPLICATE and move into place on the flyer. Adjust the dimensions of the 2ND DUPLICATE to WIDTH and HEIGHT 0.4". Create 3 DUPLICATES and move them into place on the flyer. Adjust the dimensions of the 3RD DUPLICATE to WIDTH and HEIGHT 0.2" and place on the flyer. Place 4 HEARTS on the RED LAYER. Set their WIDTH and HEIGHT to 0.3". Corel Draw X6 Basic Shapes Tool Corel Draw X6 Perfect Shapes Window Corel Draw X6 New Product Flyer with Hearts
  • 22. Page 22 of 31 Corel Draw X6 Tutorial – New Product Flyer www.flyertutor.com Repeat the steps to apply color, set the HEARTS on the WHITE BACKGROUND to SOLID RED and the HEARTS on the RED BACKGROUND to SOLID WHITE. You can set each Heart's color 1 by 1, or hold down the SHIFT Key and select each Heart that you need to apply the change to. You can also drag your cursor over all the Hearts you wish to select at once, just be careful not to select any other shapes. Then set the WHITE HEARTS. Next we will apply text to the Flyer, starting with the GRADIENT FILLED TITLE. Step 22: Free Fonts For the NEW PRODUCT FLYER TITLE, ADDRESS and PRODUCT NAME, the FONT used is NOT MARY KATE by Nick's Fonts, which was downloaded from FontSpace.com. If you want to view more of Nick's Fonts check out his website at www.nicksfonts.com. For the remaining text I used a Font called GABRIELLE. It can be downloaded from FontFreak.com and is designed by Dieter Steffmann. (Note for a newly downloaded Font to be usable on your machine, you must first install it. Any FONT installed while COREL DRAW is open, will not be visible in the FONT LIST. To correct this, you will have to restart the COREL DRAW program after Font(s) installation.) Corel Draw X6 Hearts with Color Applied NotMaryKate Font Gabrielle Font
  • 23. Page 23 of 31 Corel Draw X6 Tutorial – New Product Flyer www.flyertutor.com Step 23: Insert Text on a Path Select the TEXT TOOL from the TOOLBOX. Notice that the cursor changes to an X with an A. Move the cursor over the edge of the TOP RED LAYER. The cursor changes to an uppercase I and the word 'EDGE'. When you see this, it means that you are on the edge of the layer. Click there and start typing 'NEW PRODUCTS'. OK, so the TEXT appears upside down. This can be easily remedied. Step 24: Mirror Text Go up to the TOOLS CONTROL BAR and select the MIRROR TEXT VERTICALLY ICON. The TEXT is now right side up, however it is facing the wrong direction. Click on the MIRROR TEXT HORIZONTALLY ICON. The TEXT will now be right side up. Corel Draw X6 Text Tool Corel Draw X6 Upside Down Text Corel Draw X6 Mirror Text Vertically Icon Corel Draw X6 Text Mirrored Vertically Corel Draw X6 Mirror Text Icon Corel Draw X6 Text Right Side Up
  • 24. Page 24 of 31 Corel Draw X6 Tutorial – New Product Flyer www.flyertutor.com Step 25: Format Text Triple click to select all TEXT. On the TOOLS CONTROL BAR select the down arrow on the FONT LIST and choose the NOTMARYKATE FONT. The box on the right side of the FONT LIST box, click on the down arrow and set the FONT SIZE to 48PT. Select the Text by triple clicking over it and set the OUTLINE/STROKE COLOR to WHITE. Step 26: Set Gradient with Fountain Fill Go over to the TOOLBOX and select the FILL TOOL ICON. Scroll over to the pop up Menu and select FOUNTAIN FILL. Corel Draw X6 Font List Corel Draw X6 New Product Flyer Title Text Corel Draw X6 Title Text with White Stroke Corel Draw X6 Fill Tool Icon Fountain Fill
  • 25. Page 25 of 31 Corel Draw X6 Tutorial – New Product Flyer www.flyertutor.com This opens the FOUNTAIN FILL WINDOW. In the COLOR BLEND SECTION, TWO COLOR should be checked. To the right side of the FROM option, select the down arrow and choose MORE at the bottom of the COLOR PALETTE. This opens the SELECT COLOR WINDOW. Corel Draw X6 Fountain Fill Window Corel Draw X6 From Color Palette Corel Draw X6 Select Color Window
  • 26. Page 26 of 31 Corel Draw X6 Tutorial – New Product Flyer www.flyertutor.com To the right side of the PALETTE OPTION, click on the down arrow next to RGB PALETTE to reveal a popup menu. Select DOCUMENT PALETTE. Select the RED color that has been used on the flyer and click OK. Repeat this process in the FOUNTAIN FILL WINDOW to set the color for the TO option to our already used GREEN. Corel Draw X6 Document Palette Option Corel Draw X6 Select Color Window Document Palette
  • 27. Page 27 of 31 Corel Draw X6 Tutorial – New Product Flyer www.flyertutor.com In the FOUNTAIN FILL WINDOW, under the FROM and TO options, you will see MIDPOINT. Set it to 25 by either typing the number in the box or move the slider to that position. Then click OK. The TITLE TEXT will now have a GRADIENT FILL. Step 27: Set Outline Width Now we can change the size of the OUTLINE, so that the Text stands out. Select the TEXT again and on the MENU BAR, select TEXT > TEXT PROPERTIES. Corel Draw X6 Fountain Fill Gradient SettingsCorel Draw X6 New Product Flyer Gradient Filled Title Text Corel Draw X6 Text Properties
  • 28. Page 28 of 31 Corel Draw X6 Tutorial – New Product Flyer www.flyertutor.com This opens a TEXT PROPERTIES DOCKER on the right side of the Window. You will see settings for CHARACTER and PARAGRAPH. Set the OUTLINE WIDTH, represented by this ICON to 2.5PT. Then click on any white area on the canvas to see the change applied to the Text. Corel Draw X6 Text Properties Docker Corel Draw X6 Outline Width Icon Corel Draw X6 Gradient Filled Text With Outline
  • 29. Page 29 of 31 Corel Draw X6 Tutorial – New Product Flyer www.flyertutor.com Step 28: Add Remaining Text Next type the ADDRESS and HUGGABLE LOVE TEXT, setting the FONT to NOTMARYKATE. The FONT SIZE should be set to 18PT and 24PT respectively. Change the alignment of the Text by selecting the HORIZONTAL ALIGNMENT ICON and choosing RIGHT from the Menu. You also could go over to the PARAGRAPH section of the TEXT PROPERTIES DOCKER and select the ALIGN RIGHT ICON. Choose the method that is easiest for you. Set the 'PERSONALIZE' text to GABRIELLE, SIZE 40PT, and the 'HUGGABLE LOVE' text at the bottom of the flyer to NOTMARYKATE, SIZE 24PT. Repeat the step to change the color of the HUGGABLE LOVE text at the top and bottom to our RED from the DOCUMENT PALETTE. Step 29: Adjust Leading/Line Spacing You'll notice that the text at the bottom seems to overlap the RED LAYER. To fix this, simply click anywhere in the paragraph and adjust the LINE SPACING in the PARAGRAPH section of the TEXT PROPERTIES DOCKER. If you have trouble finding it, just look out for this ICON. Corel Draw X6 Horizontal Alignment Icon Corel Draw X6 Text Properties Paragraph Align Right Corel Draw X6 Right Aligned Text Corel Draw X6 Line Spacing Icon
  • 30. Page 30 of 31 Corel Draw X6 Tutorial – New Product Flyer www.flyertutor.com Set the LINE SPACING to 80%. So the almost complete flyer should look something like this: The remaining text uses the GABRIELLE FONT, at SIZE 36PT, ALIGN CENTER and has LINE SPACING set to 80%. Step 30: Save File Now all that's left to do is SAVE your file. Go to the MENU BAR and select FILE > SAVE. This opens the SAVE DRAWING WINDOW. Corel Draw X6 New Product Flyer With Text Corel Draw X6 File Menu Save Corel Draw X6 Save Drawing Window
  • 31. Page 31 of 31 Corel Draw X6 Tutorial – New Product Flyer www.flyertutor.com Browse to where you wish to save, create your file name, and click SAVE. If you are new to COREL DRAW, I hope this tutorial shed some light on some of the many functions of the COREL DRAW INTERFACE. FlyerTutor hosts Free Flyer Tutorials in various Graphic Design Programs - Microsoft Publisher, Microsoft Word, Adobe Illustrator, OpenOffice Draw, Inkscape, Corel Draw, along with over 50 Free Flyer Templates. Thank you for visiting! Corel Draw X6 New Product Flyer