Wire Wrapped Sweetheart Round Cabochon Pendant
•
6 gefällt mir•662 views

Tutorial by Judy Larson. See www.beadinggem.com for more tutorials and inspirations.

Empfohlen
Empfohlen
Weitere ähnliche Inhalte
Was ist angesagt?
Was ist angesagt? (20)
Ähnlich wie Wire Wrapped Sweetheart Round Cabochon Pendant
Ähnlich wie Wire Wrapped Sweetheart Round Cabochon Pendant (20)
Kürzlich hochgeladen
Kürzlich hochgeladen (20)
Wire Wrapped Sweetheart Round Cabochon Pendant
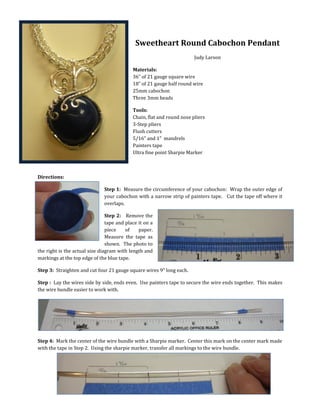
- 1. 1 Sweetheart Round Cabochon Pendant Judy Larson Materials: 36” of 21 gauge square wire 18” of 21 gauge half round wire 25mm cabochon Three 3mm beads Tools: Chain, flat and round nose pliers 3-Step pliers Flush cutters 5/16” and 1” mandrels Painters tape Ultra fine point Sharpie Marker Directions: Step 1: Measure the circumference of your cabochon: Wrap the outer edge of your cabochon with a narrow strip of painters tape. Cut the tape off where it overlaps. Step 2: Remove the tape and place it on a piece of paper. Measure the tape as shown. The photo to the right is the actual size diagram with length and markings at the top edge of the blue tape. Step 3: Straighten and cut four 21 gauge square wires 9” long each. Step : Lay the wires side by side, ends even. Use painters tape to secure the wire ends together. This makes the wire bundle easier to work with. Step 4: Mark the center of the wire bundle with a Sharpie marker. Center this mark on the center mark made with the tape in Step 2. Using the sharpie marker, transfer all markings to the wire bundle.
- 2. 2 Step 5: Using your half round wire, make seven wraps to show on the center marked line. Starting on the next lines out from center and working outward, make four wraps to show with half round wire. Place the wrapped bundle next to your diagram and check to make sure that the wraps are lined up with the marks. If the wraps need to be moved, use your fingernail or a wooden dowel, NOT a metal tool, to move the wraps. Once the wraps are where you want them, you can snug them down tighter with your flat nose pliers. Front and back sides are shown below. Step 6: You will be making a 90° bend AWAY from the wrong side of the bundle, TOWARD the outside (right side) of the wire bundle. Place your flat nose pliers on the outer line so you can barely see the line. You could even cover the line just a hair. With your fingers, bend the bundle of wires 90° over the top of the pliers. Step 7: Center the wire bundle on the 1” mandrel. Carefully bend the bundle around the mandrel. The 90° bent wires should meet or be extremely close. When you pull the top wires close together around the cabochon, they should meet and the cabochon should be tight in the wire bezel you just created. The bezel will spring out a bit, right photo, until you wrap the bent wires together. Step 8: Using painters tape, secure all the wire ends together. Temporarily secure the cabochon in the bezel with painters tape.
- 3. 3 Step 9: Make a hook about 1” from the end of the half round wire. The bend should be wide enough to accommodate two thicknesses of square wire. Position the hook at the base of the straight wires with the cut end toward the back and the bend on the front of the assembly. Wrap tightly around the square wires, tightening down the half round wire after each wrap, until there are 5 wraps showing in the front. Try not to overlap the wraps but have them nestle tightly side by side. DO NOT CUT THE WRAP WIRE OFF! Step 10: Remove the tape from the wires. Pull the back two wires slightly away from the bundle. Step 11: Using the largest section of a 3-step pliers, grasp the two separated wires about ½” up from the last wrap. Bend the wires around the plier barrel as shown until they touch the back of the cabochon. Step 12: Make a 30° bend in the bail wires about 1/8” up from the last wrap. You will need to hold the assembly up and “eyeball” where to place your pliers for the bend. Step 13: Make sure that the wrap wires are underneath the bent bail wires on the back of the assembly (see above photo). Hold the bail wires tightly to the cabochon. Using the long wrap wire, wrap, going down around the bail wires and previously wrapped section, securing the bail wires tightly to the assembly. Tighten down the half round wire after each wrap. Try not to overlap the wraps but to have them nestle tightly side by side. Trim the short wrap wire off close to the bail wires after three wraps have been made.
- 4. 4 Step 14: Trim the bail wires off below and flush with the last wrap. Step 15: Slip the wrap wire tail between the cabochon and bezel just under the last wrap. Pull the wire tightly to the front. Trim the wire even with the bezel wires. When you remove the tape holding the cabochon in place, push the wire up into the assembly. Step 16: Remove the painters tape from the cabochon. Use round or chain nose pliers to make bends in the outer back wire close to each wrap on the back of the cabochon. Notice that the tips of the pliers are spread a bit. Note: Be extremely careful to not scratch your cabochon. Once you make a bend, you really can’t go back and fix it, so go slowly and be patient. You do not need to make bends at the top of the cabochon.
- 5. 5 Step 17: Turn the assembly over to the front. Use your thumbnail to separate and push up the top wire on either side of center bottom. Note: If you do not have thumbnails long enough to do this, use a non- serrated knife to separate the wires and a ½” dowel to push the wires up. Step 18: Separate the remaining wires, three to each side. Optional: Twist the center wire in each section. Step 19: Curve each wire set around as shown. If you can’t do this easily or neatly by hand, bend the wires around a 5/16” mandrel. Step 20: Trim the left side wires so that they overlap the cabochon slightly. Using round or chain nose pliers, make a small curl at the end of each wire. Note: You may need to trim the wires to get the desired effect.
- 6. 6 Step 21: Make a curved sweep over the top of the cabochon with the wires from the right side. Trim the wires so that the wire closer to the center of the cabochon is shorter than the one to the outside. Slide three 3mm beads on the longer wire. Using round or chain nose pliers, make a small curl at the end of each wire. Note: You may need to trim the wires to get the desired effect. Step 23: Make adjustments in the curls so that they are staggered up the cabochon. Your pendant is finished!